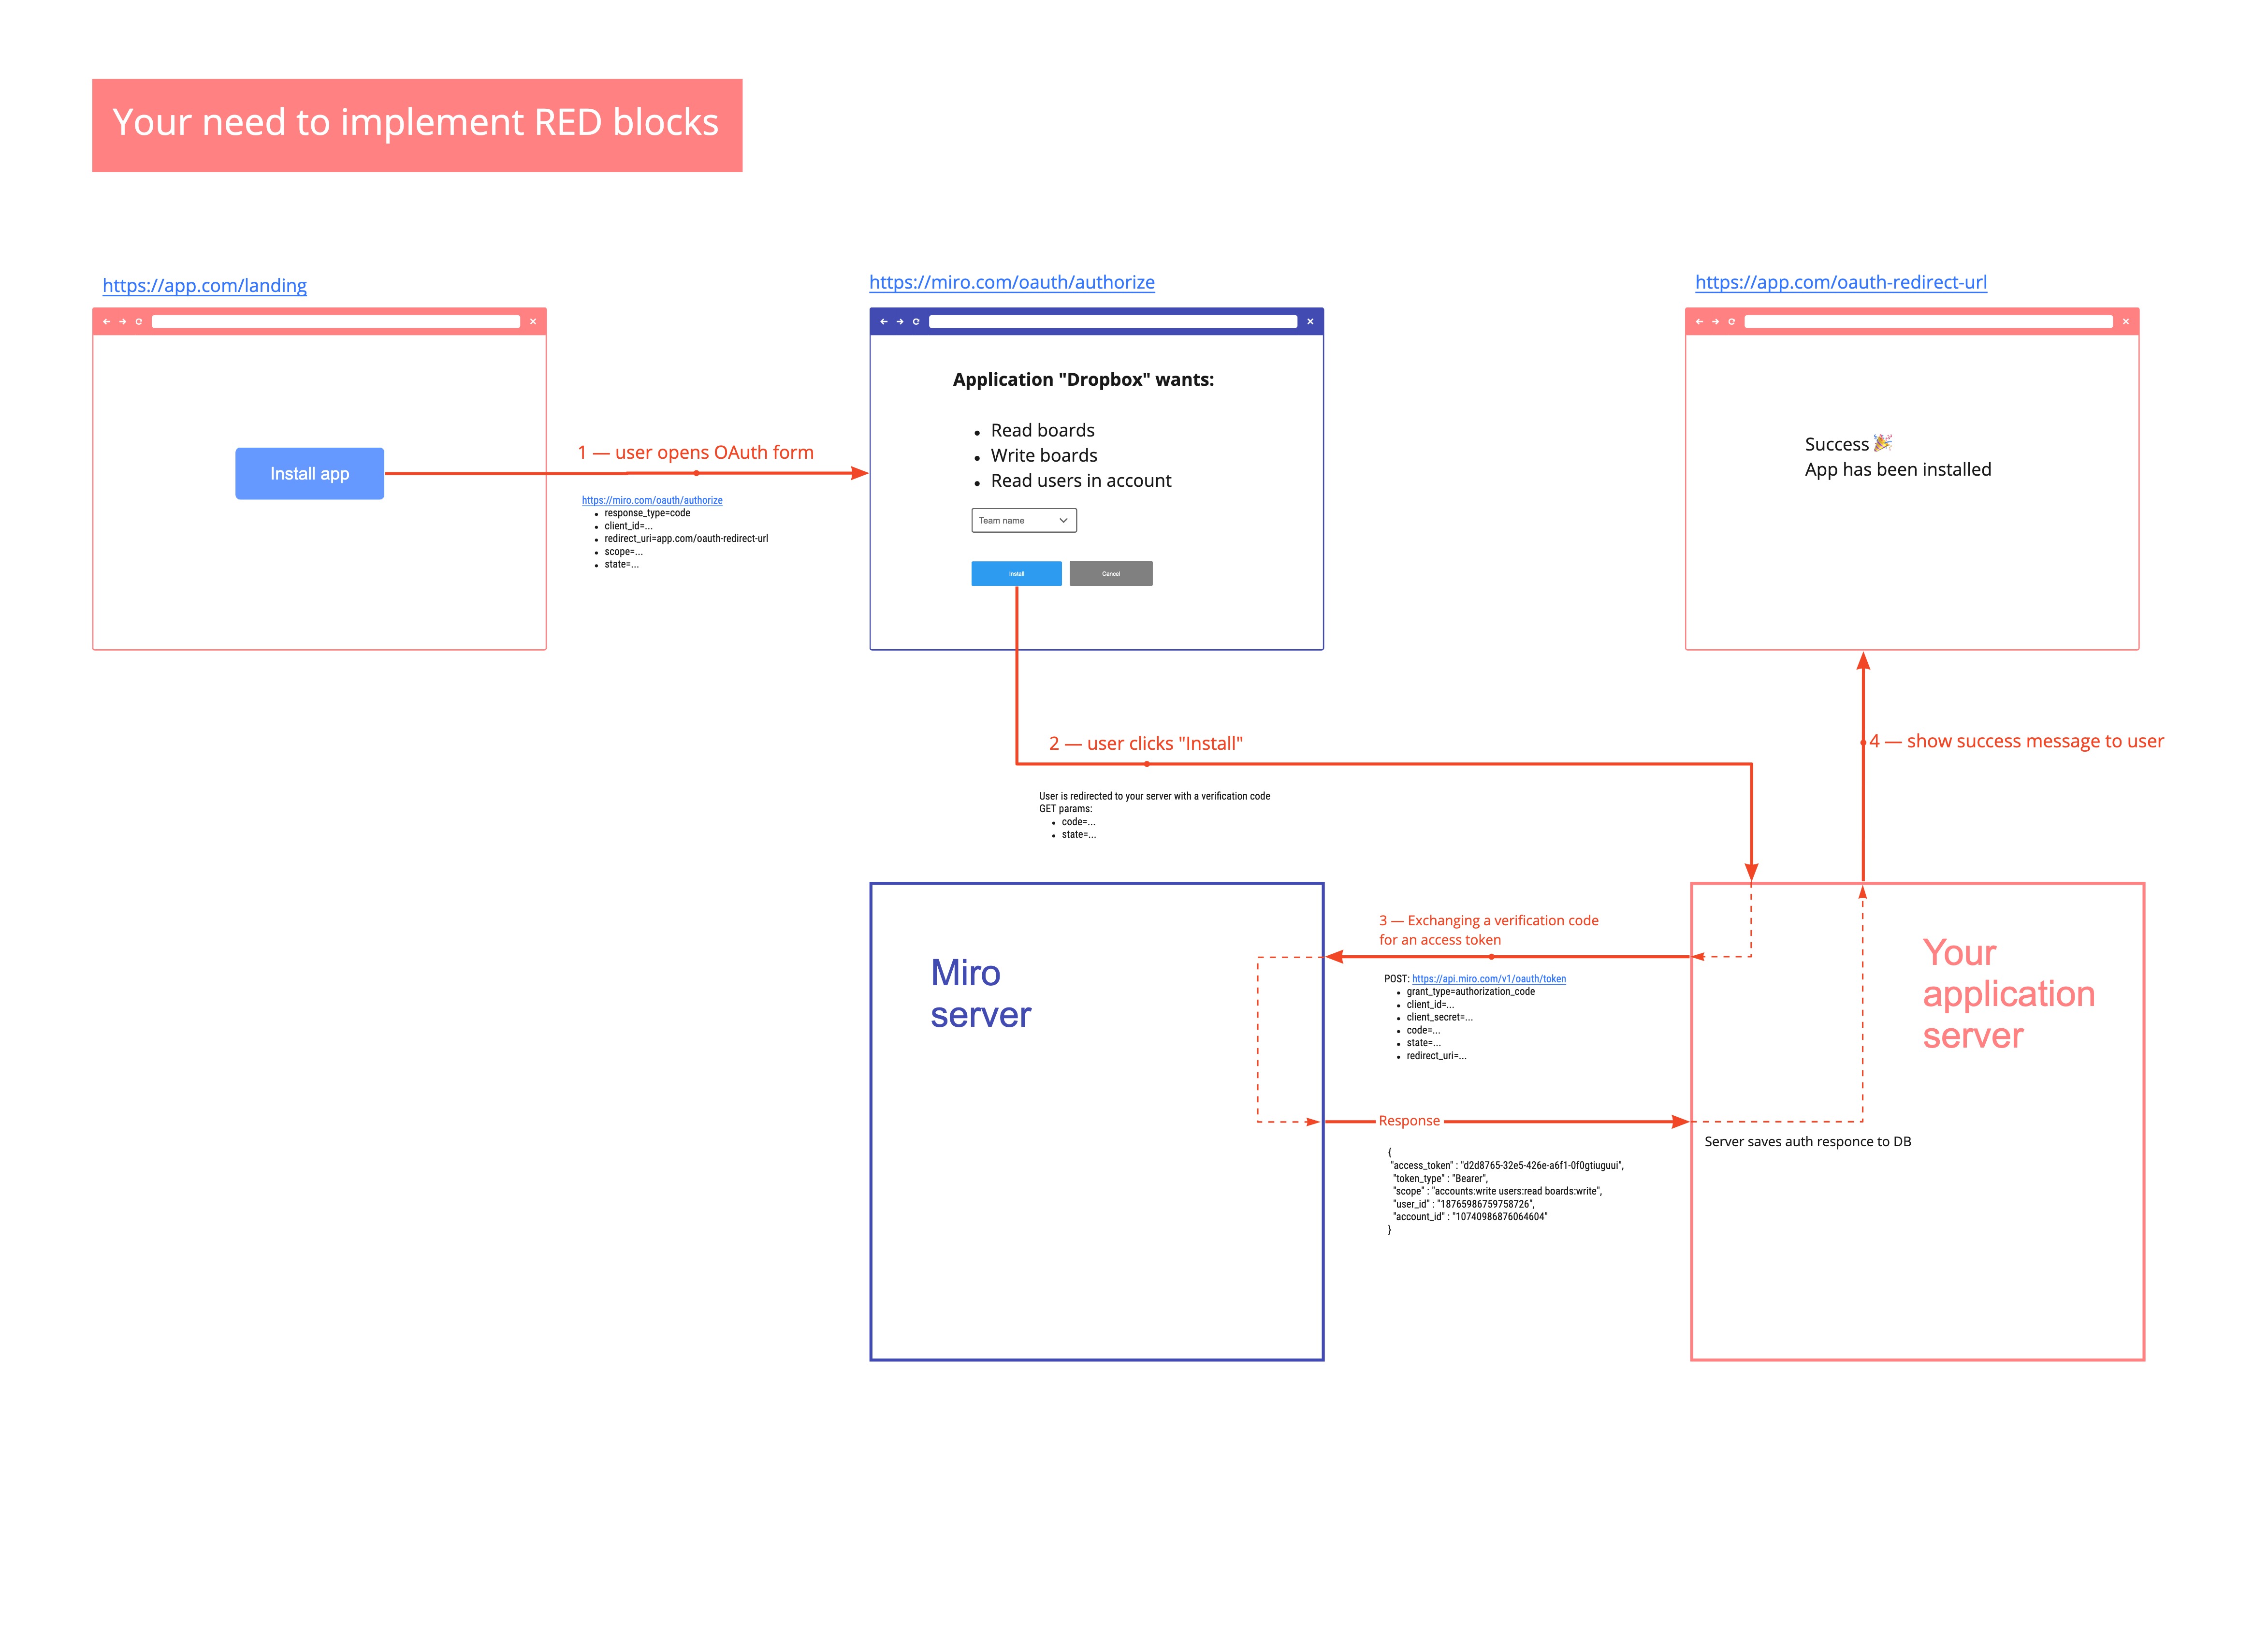
OAuth 2.0 (RFC 6749) is a protocol that lets your app request authorization to private details in a user's without getting their password. It's also the vehicle by which Miro apps are installed on a team.
Your app asks for specific permission scopes and is rewarded with access tokens upon a user's approval.
You'll need to register your app before getting started. A registered app is assigned a unique Client ID and Client Secret which will be used in the OAuth flow. The Client Secret should not be shared.
NodeJS demo app
Check out this demo app to see how to pass oAuth
https://github.com/miroapp/app-examples/tree/master/sample-app

OAuth flow visualization
Step 0 - Create Dev Team and an application
Before you start building authorization flow, you need to a Dev Team and an application.
Follow this guide to do it
Step 1 — Sending users to authorize and/or install
To begin the authorization flow, the application constructs a URL like the following and opens a browser to that URL:
https://miro.com/oauth/authorize
The following values should be passed as GET parameters:
response_type=code — This tells the authorization server that the application is initiating the authorization code flow (required)
client_id — The public identifier for the application, obtained when the developer first registered the application (required)
redirect_uri — Tells the authorization server where to send the user back to after they approve the request (required)
state — The application generates a random string and includes it in the request. It should then check that the same value is returned after the user authorizes the app. This is used to prevent CSRF attacks (optional)
team_id — Pick the specific team in OAuth form (optional)
If the user is not signed in yet, the user will be asked to sign in.
https://miro.com/oauth/authorize?response_type=code&client_id=...&redirect_uri=...&state=...
Step 2 — Users are redirected to your server with a verification code
If the user authorizes your app, Miro will redirect back to your specified redirect_uri with a temporary code in a code GET parameter, as well as a state parameter if you provided one in the previous step.
Redirect URL registration
Since the redirect URL will contain confidential information, it is important that Miro does not redirect the user to arbitrary locations. To do this, please register one or more redirect URLs when creating the application. For request-specific data, you can use the state parameter to store data that will be included after the user is redirected. You can either encode the data in the state parameter itself or use the state parameter as a session ID to store the state on the server.
The
statevalue will be the same value that the application initially set in the request. The application is expected to check that the state in the redirect matches the state it originally set. This protects against CSRF and other related attacks.
Authorization codes may only be exchanged once and expire 10 minutes after issuance.
Step 3 — Exchanging a verification code for an access token
If all is well, exchange the authorization code for an access token using the API method.
https://api.miro.com/v1/oauth/token
grant_type=authorization_code — This tells the token endpoint that the application is using the Authorization Code grant type.
client_id — The application’s client ID.
client_secret — The application’s client secret. This ensures that the request to get the access token is made only from the application, and not from a potential attacker that may have intercepted the authorization code.
code — The application includes the authorization code it was given in the redirect.
redirect_uri — The same redirect URI that was used when requesting the code, including slash in the end
These parameters should be passed in URL, not as body of the request.
An app is considered installed on the team after exchanging code for a token.
You'll receive a JSON response containing an access_token (among other details):
{
  "access_token" : "d2d8a7ea-32e5-426e-a6f1-0f3acced5a0e",
  "token_type" : "Bearer",
  "scope" : "team:read boards:write",
  "user_id" : "1074457322218258726",
  "team_id" : "1074457345600064604"
}
account_idfield is deprecated, please do not use it.
After the token was received the application is considered installed and should be seen in the 'installed apps' section of the team settings.
You can then use this token to call API methods on behalf of the user. The token will continue functioning until the user uninstalls your app from the team.
Miro apps can be installed multiple times by the same user and additional users on the same team.
Please note that these access tokens do not expire.
Step 4 — Using access token for REST API requests
Since you got token, you can use it for making REST API requests. There are two ways for it:
- You can pass token as query-parameter
https://api.miro.com/v1/users/me?access_token=b8c22903-8ff1-4431-9bf1-a9f687180cab
- You can pass token in
Authorizationheader
| Authorization | Bearer b8c22903-8ff1-4431-9bf1-a9f687180cab |
Get current token context
https://api.miro.com/v1/oauth-token/?access_token=...
Response:
{
    "type": "oAuthToken",
    "scopes": [
        "boards:write",
        "boards:read"
    ],
    "team": {
        "type": "team",
        "name": "Demo team",
        "id": "30744523423422454690"
    },
    "user": {
        "type": "user",
        "email": "[email protected]",
        "name": "Oleg Plotnikov",
        "state": "registered",
        "id": "7010897325345"
    },
    "createdAt": "2018-12-14T10:31:34Z",
    "createdBy": {
        "type": "user",
        "email": "[email protected]",
        "name": "Oleg Plotnikov",
        "state": "registered",
        "id": "7010897325345"
    },
    "id": "3074457346359808734"
}
accountfield is deprecated, please do not use it.
Revoking tokens and uninstalling apps
https://api.miro.com/v1/oauth/revoke?access_token=...