Connector
Connector
The connector item creates lines to connect two items on the board.
Connectors are useful when drawing diagrams, flow charts, and mind maps.
The line of a connector item must have two terminal points: a start and an end point.
These points are located on the area of the board items that they connect.
If you remove either the start point, the end point, or both, the connector is removed as well.
It's possible to style connector lines by defining properties such as thickness, color, and type.
You can also assign a shape to either or both ends of a connector.
For example, to indicate the direction of the connection.
ℹ️ Note:
- When creating connectors programmatically, either with the Web SDK or the REST API, it's not possible to create loose (both ends disconnected) or dangling (one end disconnected) connectors.
- To create a connector, you must specify at least:
- You can set the location of the terminal points in one of the following ways:
- Either specify the
position.xandposition.ycoordinates of each point. - Or specify the
snapToproperty for each point. - You cannot specify both
positioncoordinates andsnapToproperties for thestartandendpoints.
- Either specify the
See also:
- Connection lines on the Miro Help Center.
Example:
// Create a shape to use as a start point for the connector.
const start = await miro.board.createShape({
  content: 'start',
  x: 4500,
});

// Create a shape to use as an end point for the connector.
const end = await miro.board.createShape({
  content: 'end',
  x: 4800,
});

// Create a connector.
const connector = await miro.board.createConnector({
  shape: 'elbowed',
  style: {
    startStrokeCap: 'diamond',
    endStrokeCap: 'stealth',
    strokeStyle: 'dashed',
    strokeColor: '#ff00ff', // Magenta
    strokeWidth: 2,
  },
  // Set the start point of the connector.
  start: {
    // Define the start board item for the connector by specifying the 'start' item ID.
    item: start.id,
    // Set a point on the border of the 'start' shape to mark the start point of the connector.
    position: {
      // Horizontal: right
      x: 1.0,
      // Vertical: middle
      y: 0.5,
    },
  },
  // Set the end point of the connector.
  end: {
    // Define the end board item for the connector by specifying the 'end' item ID.
    item: end.id,
    // Set a snapTo of 'end' shape to mark the end point of the connector.
    snapTo: 'right',
  },
  captions: [
    {
      content: 'This connector links a start and an end shape.',
      position: 0.5,
      textAlignVertical: 'bottom',
    },
  ],
});

/* Remove the 'end' shape item.
 * The connector is automatically removed as well, because the operation removes also
 * one of the terminal points of the connector.
 */
const removeEndShape = async () => {
  await miro.board.viewport.zoomTo(connector);
  setTimeout(async () => {
    await miro.board.remove(end);
  }, 3000);
};

await removeEndShape();
Connector example:
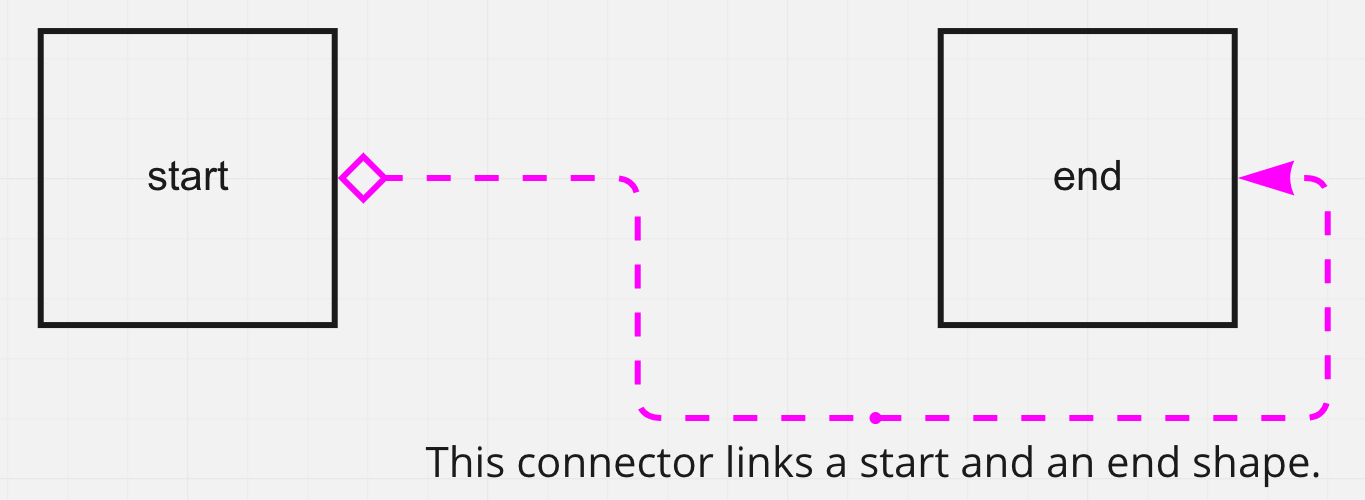
Figure 1. The connector joins the start and end shapes. It starts from the point defined in start.position, and it ends at the point defined in end.snapTo.
Properties
shape
'straight' | 'elbowed' | 'curved'
shape
shapeSets the shape of the line for the connector item.
Possible values:
straight: the line is completely straight.elbowed: the line isn't straight. It bends at 90 degree angles.curved: the line isn't straight. It bends in smooth curves.
Default: curved

Figure 1. Visual representation of straight, elbowed, and curved line shapes.
start?
Endpoint
The start object groups properties that define:
- The board item that the start point of the connector attaches at.
To define the start board item, you must specify the item ID. - Position of the start point that can be defined in one of the following ways:
snapTovalues that are based on predefined positions (specifically center of a connected item's edge)xandycoordinates for custom location on the connected shape
ℹ️ Note:
- The default value is
undefined.
However, you must specify astartand anendfor the connector. - When creating connectors programmatically, either with the Web SDK or the REST API, it's not yet possible to create loose (both ends disconnected) or dangling (one end disconnected) connectors.
start data structure with snapTo:
start: {
	// Define the start board item for the start point of the connector
	// by specifying the item ID.
  item: '3458764511234567896',
  snapTo: 'right'
}
start data structure with custom position:
start: {
	// Define the start board item for the start point of the connector
	// by specifying the item ID.
  item: '3458764511234567896',
  position: {
	  // x: 0.0 = left; x: 0.5 = center; x: 1.0 = right
		x: 1.0,
 	  // y: 0.0 = top; y: 0.5 = center; y: 1.0 = bottom
	  y: 0.0
  }
}
item
itemThe start or end item that each connector point is attached to.
To define start and end board items of a connector, you specify the ID of the corresponding items.
Example:
item: '3458764511234567890';
position
positionThe position object is nested inside the start and end objects.
It includes the x and y coordinates that mark the start and end points of the connector.
ℹ️ Note:
- For the
startandendpoints specify eitherpositioncoordinates, orsnapToproperties.
For reference, these are the x and y coordinates that define top-left, center, and bottom-right positions to mark the start or end point of a connector:
x: 0.0,y: 0.0= top-left corner of the border of the start or end shape.x: 0.5,y: 0.5= center of the start or end shape.x: 1.0,y: 1.0= bottom-right corner of the border of the start or end shape.
position data structure:
position: {
  // x: 0.0 = left; x: 0.5 = center; x: 1.0 = right
  x: 1.0,
  // y: 0.0 = top; y: 0.5 = center; y: 1.0 = bottom
  y: 0.0
}
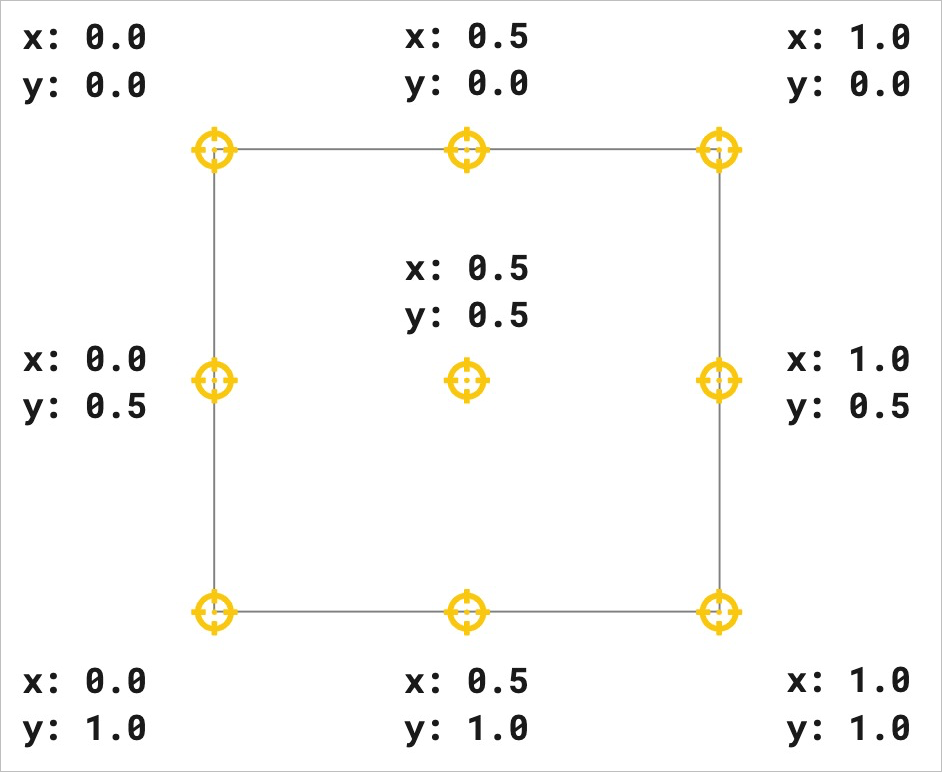
Figure 1. Visual representation of horizontal and vertical reference coordinates.
x
xThe x-axis coordinate of the start or end point of a connector.
x accepts numerical values between 0.0 and 1.0 included.
For reference, these are the x coordinates that define horizontal left, center, and right positions to mark the start or end point of a connector:
x: 0.0= leftx: 0.5= centerx: 1.0= right
y
yThe y-axis coordinate of the start or end point of a connector.
y accepts numerical values between 0.0 and 1.0 included.
For reference, these are the y coordinates that define vertical top, middle, and bottom positions to mark the start or end point of a connector:
y: 0.0= topy: 0.5= middley: 1.0= bottom
snapTo
snapToThe snapTo property is nested inside the start and end objects.
You can set the snapTo property as an alternative to position.x and position.y to set a connector terminal point to a specific, predefined position on the shape border.
The snapTo property accepts the following values:
top: the terminal point is positioned at the top of the connected board item.
It corresponds to thepositioncoordinatesx: 0.5,y: 0.0.bottom: the terminal point is positioned at the bottom of the connected board item.
It corresponds to thepositioncoordinatesx: 0.5,y: 1.0.left: the terminal point is positioned on the left side of the connected board item.
It corresponds to thepositioncoordinatesx: 0.0;y: 0.5.right: the terminal point is positioned on the right side of the connected board item.
It corresponds to thepositioncoordinatesx: 1.0;y: 0.5.auto: the terminal point is positioned dynamically, and it updates automatically, based on the location on the board of the connected item.
It corresponds to thepositioncoordinatesundefined.
ℹ️ Note:
- For the
startandendpoints specify eitherpositioncoordinates, orsnapToproperties.
snapTo and position are always in sync, and they're mutually exclusive.
The following table lists the snapTo property values, the position property values, and the description of the connector point position.
position | snapTo | Connector point position |
|---|---|---|
x: 0.5; y: 0.0 | top | Top of the connected item. |
x: 0.0; y: 0.5 | left | Left of the connected item. |
x: 0.5; y: 1.0 | bottom | Bottom of the connected item. |
x: 1.0; y: 0.5 | right | Right of the connected item. |
undefined | auto | Dynamically updates the point position, based on the location on the board of the connected item. |
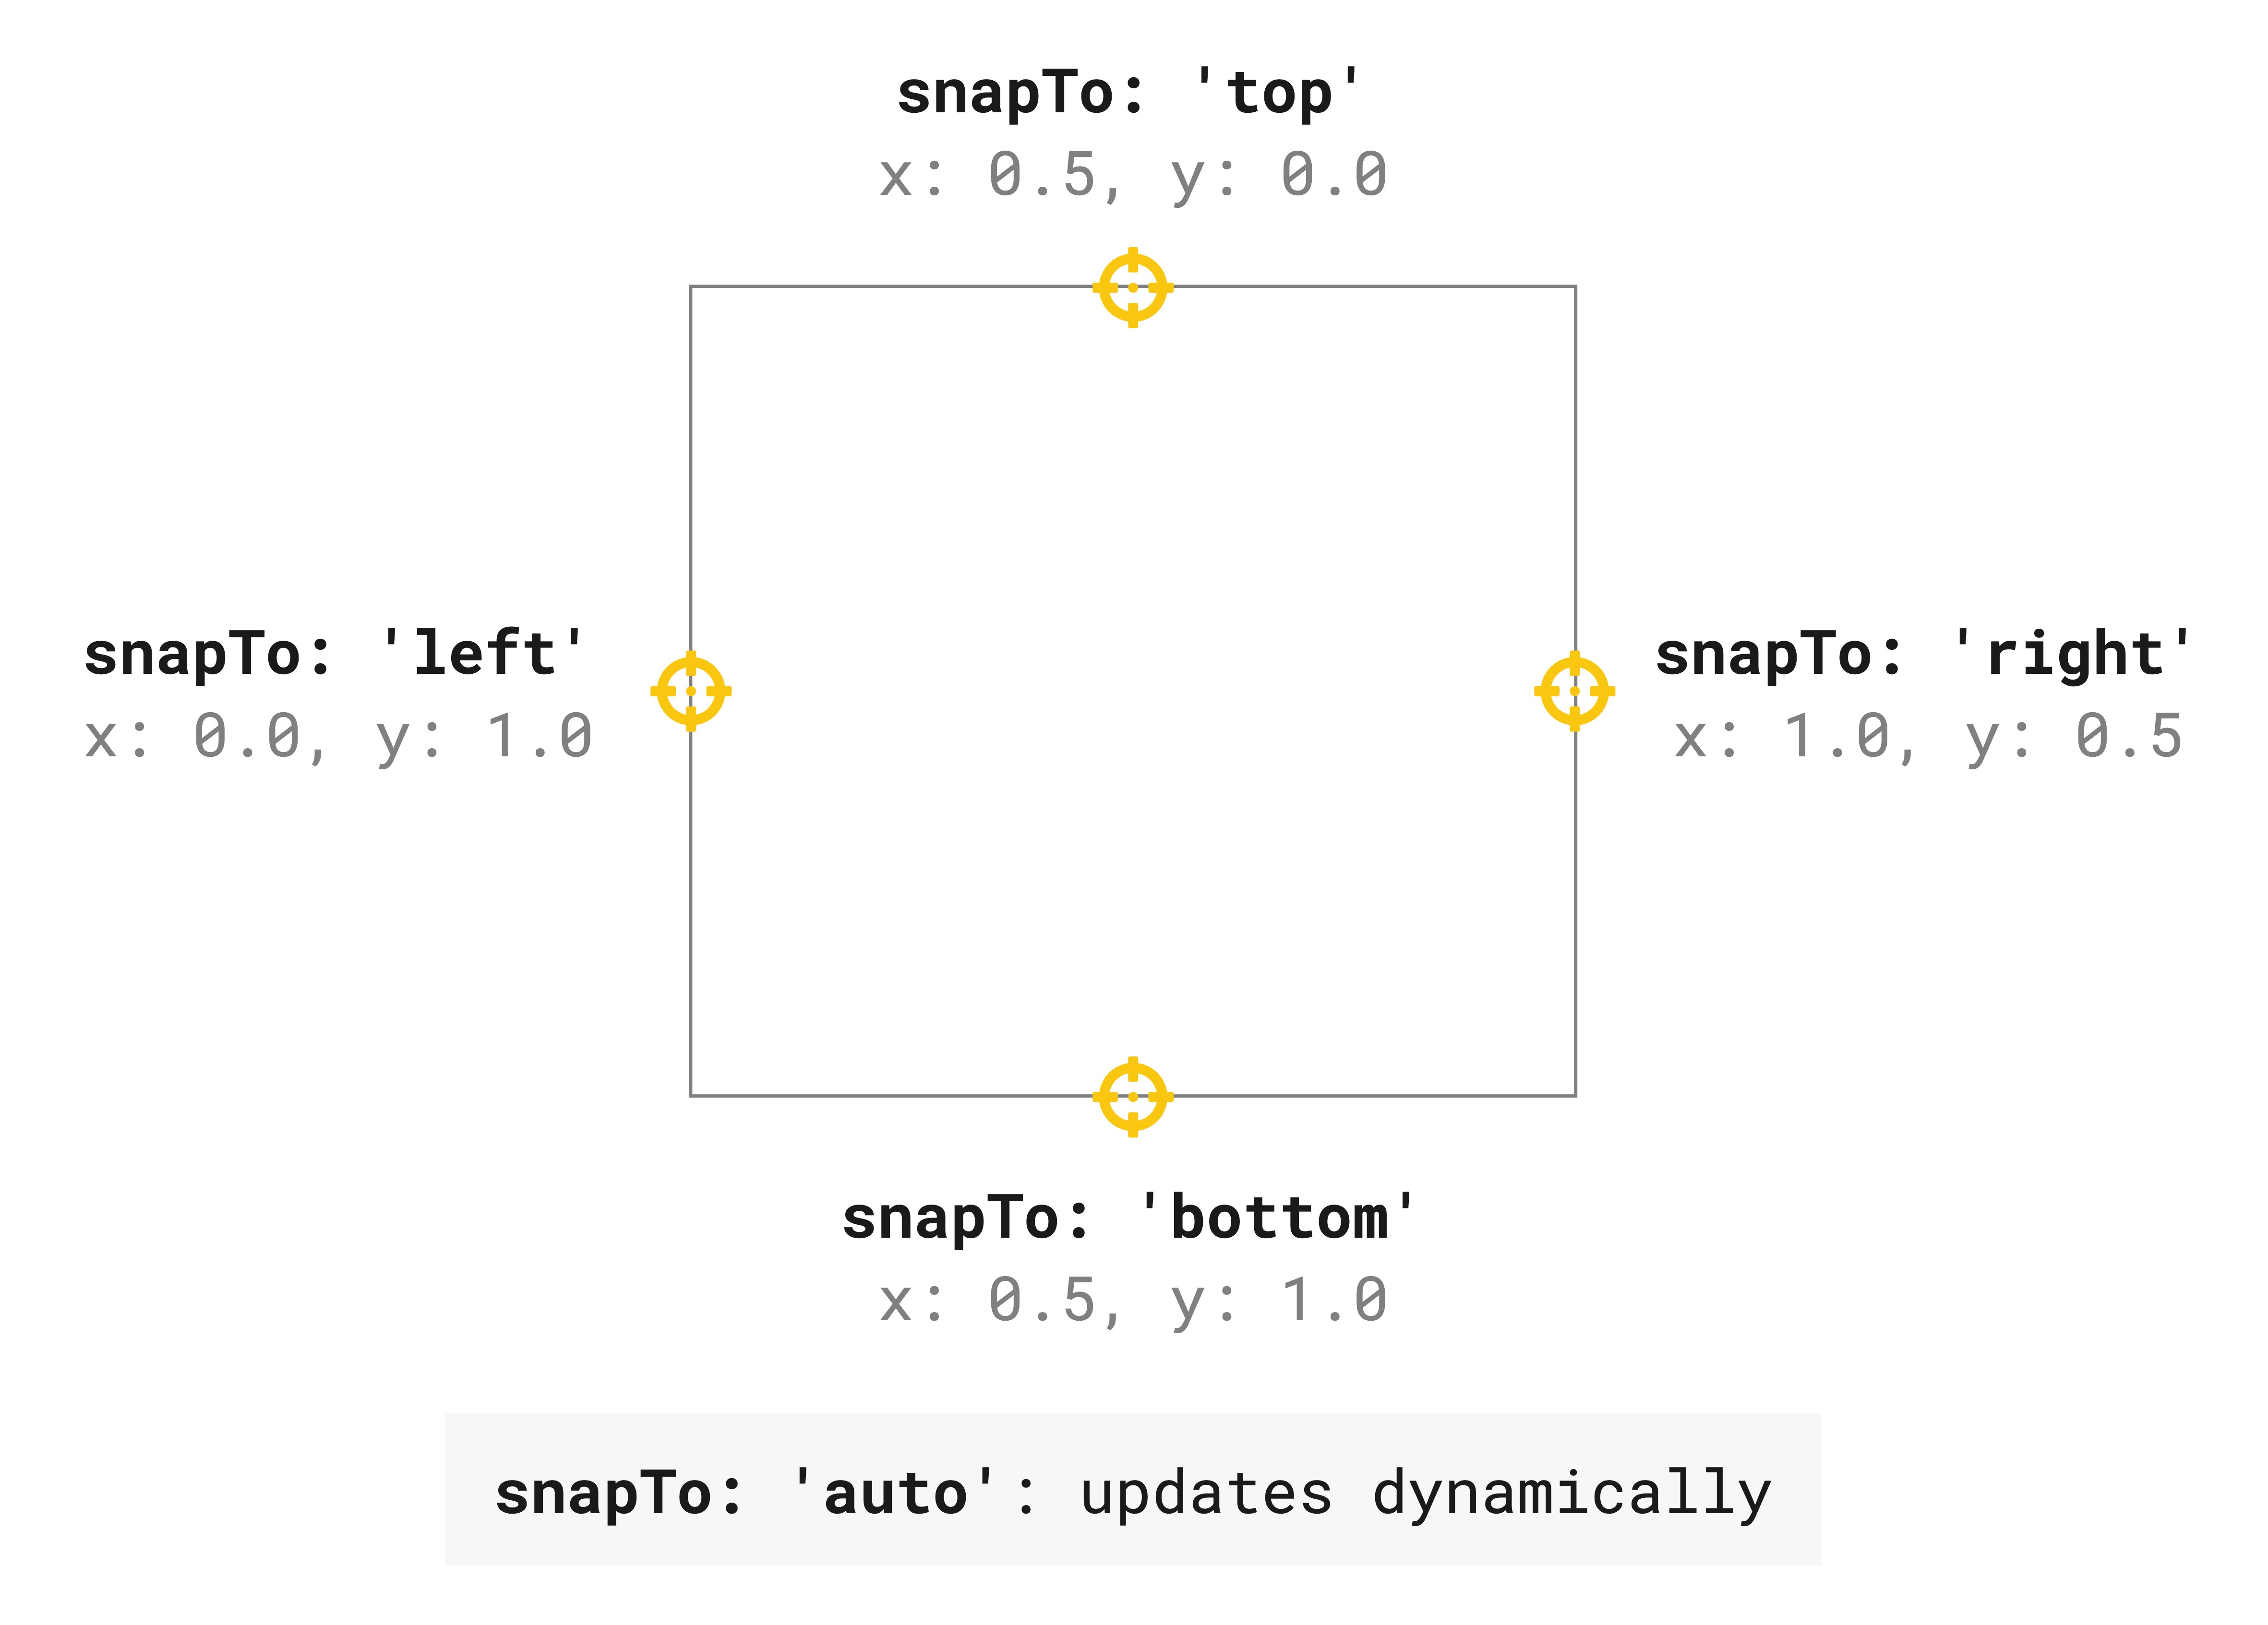
Figure 1. Visual representation of the predefined snapTo positions.
end?
Endpoint
The end object groups properties that define:
- The board item that the end point of the connector attaches at.
To define the end board item, you must specify the item ID. - Position of the end point that can be defined in one of the following ways:
snapTovalues that are based on predefined position (specifically center of a connected item's edge)xandycoordinates for custom location on the connected shape
ℹ️ Note:
- The default value is
undefined.
However, you must specify astartand anendfor the connector. - When creating connectors programmatically, either with the Web SDK or the REST API, it's not yet possible to create loose (both ends disconnected) or dangling (one end disconnected) connectors.
end data structure with snapTo:
end: {
	// Define the end board item for the end point of the connector
	// by specifying the item ID.
  item: '3458764511234567896',
  snapTo: 'left'
}
end data structure with custom position:
end: {
	// Define the end board item for the end point of the connector
	// by specifying the item ID.
  item: '3458764511234567896',
  position: {
	  // x: 0.0 = left; x: 0.5 = center; x: 1.0 = right
		x: 1.0,
 	  // y: 0.0 = top; y: 0.5 = center; y: 1.0 = bottom
	  y: 0.0
  }
}
item
itemThe start or end item that each connector point is attached to.
To define start and end board items of a connector, you specify the ID of the corresponding items.
Example:
item: '3458764511234567890';
position
positionThe position object is nested inside the start and end objects.
It includes the x and y coordinates that mark the start and end points of the connector.
ℹ️ Note:
- For the
startandendpoints specify eitherpositioncoordinates, orsnapToproperties.
For reference, these are the x and y coordinates that define top-left, center, and bottom-right positions to mark the start or end point of a connector:
x: 0.0,y: 0.0= top-left corner of the border of the start or end shape.x: 0.5,y: 0.5= center of the start or end shape.x: 1.0,y: 1.0= bottom-right corner of the border of the start or end shape.
position data structure:
position: {
  // x: 0.0 = left; x: 0.5 = center; x: 1.0 = right
  x: 1.0,
  // y: 0.0 = top; y: 0.5 = center; y: 1.0 = bottom
  y: 0.0
}

Figure 1. Visual representation of horizontal and vertical reference coordinates.
x
xThe x-axis coordinate of the start or end point of a connector.
x accepts numerical values between 0.0 and 1.0 included.
For reference, these are the x coordinates that define horizontal left, center, and right positions to mark the start or end point of a connector:
x: 0.0= leftx: 0.5= centerx: 1.0= right
y
yThe y-axis coordinate of the start or end point of a connector.
y accepts numerical values between 0.0 and 1.0 included.
For reference, these are the y coordinates that define vertical top, middle, and bottom positions to mark the start or end point of a connector:
y: 0.0= topy: 0.5= middley: 1.0= bottom
snapTo
snapToThe snapTo property is nested inside the start and end objects.
You can set the snapTo property as an alternative to position.x and position.y to set a connector terminal point to a specific, predefined position on the shape border.
The snapTo property accepts the following values:
top: the terminal point is positioned at the top of the connected board item.
It corresponds to thepositioncoordinatesx: 0.5,y: 0.0.bottom: the terminal point is positioned at the bottom of the connected board item.
It corresponds to thepositioncoordinatesx: 0.5,y: 1.0.left: the terminal point is positioned on the left side of the connected board item.
It corresponds to thepositioncoordinatesx: 0.0;y: 0.5.right: the terminal point is positioned on the right side of the connected board item.
It corresponds to thepositioncoordinatesx: 1.0;y: 0.5.auto: the terminal point is positioned dynamically, and it updates automatically, based on the location on the board of the connected item.
It corresponds to thepositioncoordinatesundefined.
ℹ️ Note:
- For the
startandendpoints specify eitherpositioncoordinates, orsnapToproperties.
snapTo and position are always in sync, and they're mutually exclusive.
The following table lists the snapTo property values, the position property values, and the description of the connector point position.
position | snapTo | Connector point position |
|---|---|---|
x: 0.5; y: 0.0 | top | Top of the connected item. |
x: 0.0; y: 0.5 | left | Left of the connected item. |
x: 0.5; y: 1.0 | bottom | Bottom of the connected item. |
x: 1.0; y: 0.5 | right | Right of the connected item. |
undefined | auto | Dynamically updates the point position, based on the location on the board of the connected item. |

Figure 1. Visual representation of the predefined snapTo positions.
style
{
  color?: string
  endStrokeCap?: 'none' | 'stealth' | 'rounded_stealth' | 'arrow' | 'filled_triangle' | '...'
  fontSize?: number
  startStrokeCap?: 'none' | 'stealth' | 'rounded_stealth' | 'arrow' | 'filled_triangle' | '...'
  strokeColor?: string
  strokeStyle?: 'normal' | 'dotted' | 'dashed'
  strokeWidth?: number
  textOrientation?: 'horizontal' | 'aligned'
}
startStrokeCap
startStrokeCapSets the shape of the start/head of the connector.
It accepts values from a list of supported shape types.
Default: none (No shape for the start point of the connector.)
endStrokeCap
endStrokeCapSets the shape of the tail end of the connector.
It accepts values from a list of supported shape types.
Default: stealth (An arrow shape for the end point of the connector.)
Available stroke cap values, and their corresponding left and right shapes displayed on the board UI:
| Stroke cap | Left and right stroke caps |
|---|---|
none |  |
stealth |  |
rounded_stealth |  |
arrow |  |
filled_triangle |  |
triangle |  |
filled_diamond |  |
diamond |  |
filled_oval |  |
oval |  |
erd_one |  |
erd_many |  |
erd_one_or_many |  |
erd_only_one |  |
erd_zero_or_many |  |
erd_zero_or_one |  |
strokeStyle
strokeStyleSets the type of line for the connector item.
Possible values:
normal: the line is solid.dashed: the line is represented by a series of short dashes.dotted: the line is represented by a series of dots.
Default: normal

Figure 1. Visual representation of normal, dashed, and dotted line types.
strokeWidth
strokeWidthSets the thickness of the line for the connector item.
It accepts an integer between 1 and 24 included.
- Min. (thin):
1 - Max. (thick):
24
Default: 1
strokeColor
strokeColorHex value representing the color of the connector item line.
Default: #000000 (black)
fontSize
fontSizeDefines the font size, in dp, for the caption of the connector.
- Default font size:
14
color
colorHex value representing the color of the connector captions.
Default: #1a1a1a (dark grey)
textOrientation
textOrientationThe orientation of the caption relative to the curvature of the connector.
Possible values:
aligned: the caption is aligned with the curvature of the connector.horizontal: the caption appears horizontally regardless of the curvature of the connector.
Default: aligned
captions?
Array<{ content?: string; position?: number; textAlignVertical?: 'top' | 'middle' | 'bottom' }>
captions
captionsAn array of objects.
Each caption object groups properties that define:
- The text that appears along the connector.
- The position of the caption, relative to the connector.
- The vertical alignment of the caption, relative to the connector.
Caption data structure:
{
  content?: string
  position?: number
  textAlignVertical?: 'top' | 'middle' | 'bottom'
}
content (captions)
content (captions)The accompanying text displayed along the connector.
For example, you add text to content to describe the relationship between the two items that the connector links.
position (captions)
position (captions)The position of the caption, relative to the connector.
position accepts numerical values between 0.0 and 1.0 included.
For example:
0.0: the caption is at the start of the connector.0.5: the caption is in the middle of the connector.1.0: the caption is at the end of the connector.
Default: 0.5 (middle)
textAlignVertical (captions)
textAlignVertical (captions)The vertical alignment of the caption, relative to the connector.
For example, set textAlignVertical to bottom to display the caption under the connector.
Possible values:
top: the caption is above the connector.middle: the caption is in the middle, along the the connector.bottom: the caption is under the connector.
Default: middle
id
readonly string
Unique ID of the item, assigned automatically upon creation.
Example: 3658432978520043388
type
readonly 'connector'
Defines the type of item.
Item type is useful to retrieve specific items from a board. For example, you can fetch all card and shape items from the board, and then carry out an action on them.
Example:
// Get all items from the board
const items = await miro.board.get();

// Count all card and shape items on the board
let cards = 0;
let shapes = 0;

items.forEach((items) => {
  switch (items.type) {
    case 'card':
      cards++;
    case 'shape':
      shapes++;
  }
});

// Output to the console the total amount of card and shape items
console.log(`The current board has ${cards} cards and ${shapes} shapes.`);
parentId
readonly 'null' | string
If an item is a child of another item, the child's parentId returns the unique identifier of the corresponding parent item.
If an item has no parent, its parentId is null.
You can use the value to retrieve a tree structure when items are nested inside containers.
For example, sticky notes inside frames or text items inside mindmaps.
origin
'center'
origin marks:
- The positioning reference point of a board item.
This is the point used to calculate thexandycoordinates of an item when it's positioned on the board, or when it's a child inside a parent item. - The rotation pivot point of a board item that supports rotation.
origin accepts only one value: center.
Any other value throws an error.
relativeTo
'canvas_center' | 'parent_top_left' | 'parent_center'
The relativeTo property affects the x and y coordinate values of a board item.
relativeTo defines the positioning reference of a board item, which can be:
Depending on whether an item is a child of a parent item or not, relativeTo can have one of the following values:
| Value | Description | On the board UI |
|---|---|---|
canvas_center | The item is positioned on the board, and it's not a child of another item. The x and y coordinate values of the item are relative to the center of the board. | 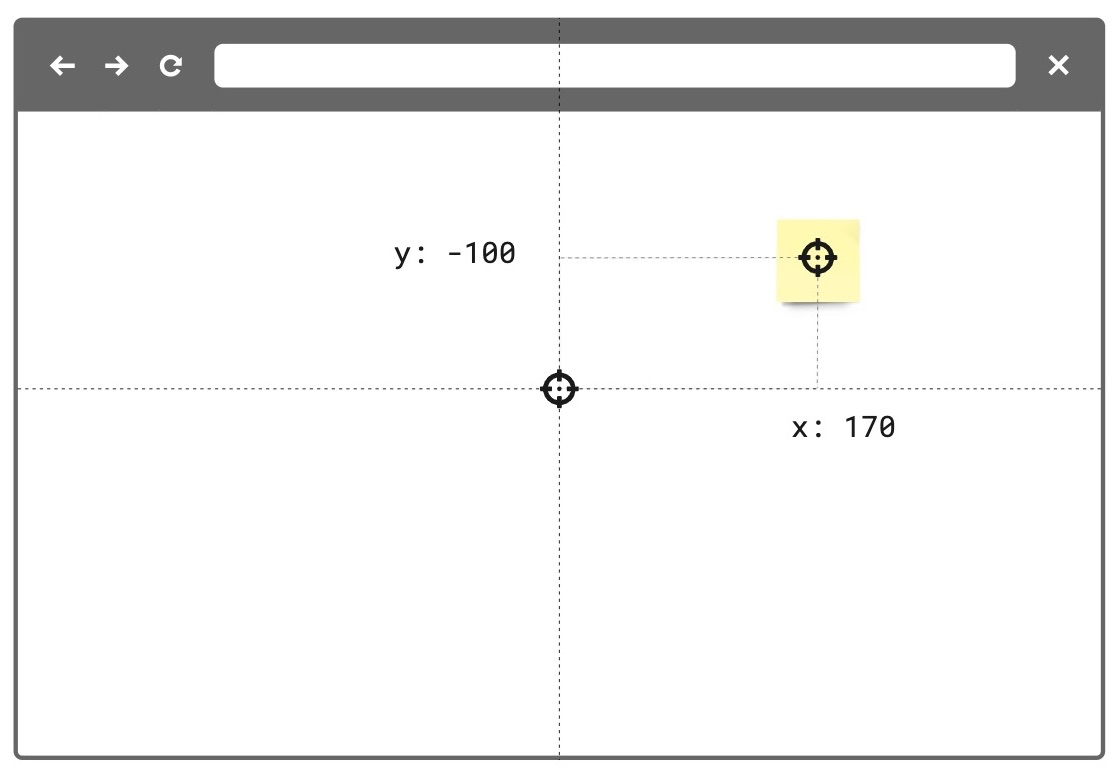 Figure 1. The relativeTo property of the board item—a sticky note in the example image—is set to canvas_center. The same mechanism applies to and works in the same way for all supported board items. |
parent_top_left | The item is positioned on the board, and it is a child of a parent item. For example, a parent frame. The x and y coordinate values of the child item are relative to the top-left corner of the parent item). | 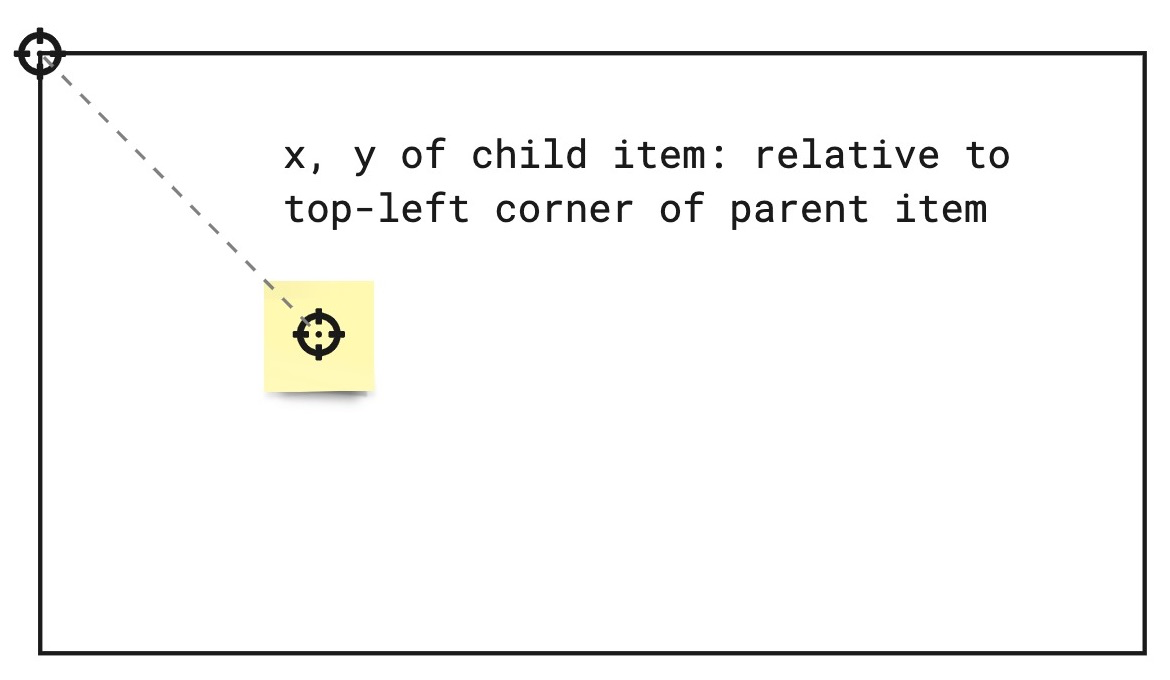 Figure 2. The relativeTo property of the board item—a sticky note in the example image—is set to parent_top_left. The same mechanism applies to and works in the same way for all supported board items. |
parent_center | The item is positioned on the board, and it is a child of a parent mind map node. The x and y coordinate values of the item are relative to the center of the parent mind map node item. |  Figure 3. The relativeTo property of the child mind map nodes is set to parent_center. |
See also:
createdAt
readonly string
Timestamp
Date and time when the item was created.
Format: UTC, ISO 8601.
Includes a trailing Z offset.
Example: 2021-05-18T07:59:01Z
ℹ️ Note:
- Timestamps indicating creation and update times are always in UTC time, regardless of the time offset configured on the machine where the app runs or where the code is executed.
createdBy
readonly string
Miro users are automatically assigned a unique ID.
createdBy contains the ID of the user who created the item.
Example: 3658432978520043388
modifiedAt
readonly string
Timestamp
Date and time when the item was last modified.
Format: UTC, ISO 8601.
Includes a trailing Z offset.
Example: 2021-05-18T07:59:01Z
ℹ️ Note:
- Timestamps indicating creation and update times are always in UTC time, regardless of the time offset configured on the machine where the app runs or where the code is executed.
modifiedBy
readonly string
Miro users are automatically assigned a unique ID.
modifiedBy contains the ID of the user who applied the most recent edit to the item.
Example: 3658432978520043388
Methods
sync(...)
() => Promise<void>
🚦 Rate limit: Level 1
sync propagates to the board any changes to item and tag properties.
After updating the properties of an item or a tag, sync it with the board to:
- Propagate to the board the changes applied to the item or to the tag.
- Make the changes visible on the board.
All board items and tags require sync to make any changes to their properties visible on the board.
For more information and examples, see Update and sync item properties.
Example:
(The code example updates a text item using sync.
The same mechanism applies to and works in the same way for all supported board items.)
// Create an item.
// In this case, a text item.
const text = await miro.board.createText({
  content: '<p>This is a piece of text to remind me that I always finish what I ...</p>',
  style: {
    fillColor: 'transparent',
    textAlign: 'left',
  },
  x: 0,
  y: 0,
  width: 450,
  rotation: 0.0,
});

// Update the board item by modifying the values of its properties.
// In the text item case, the updated properties modify content, background color, and rotation of the item.
text.content = 'A fourteneer is "A line that rumbles on like this for being a bit too long."';
text.style.fillColor = '#a9fe65';
text.rotation = 180.0;

// Call 'sync' to make the changed board item properties visible on the board.
await text.sync();

// Output the updated board item to the developer console.
console.log(text);
Example:
(The code example updates a tag using sync.
The same mechanism applies to and works in the same way for all supported board items.)
// Create a tag.
const todo = await miro.board.createTag({
  title: 'todo',
  color: 'yellow',
});

// Create a sticky note and attach the tag to it.
const stickyNote = await miro.board.createStickyNote({
  content: 'sticky note with tag: "todo"',
  tagIds: [todo.id],
});
console.log(stickyNote.tagIds); // => ['3074457345627244742']

// Update the tag properties: title and color.
todo.title = "won't fix";
todo.color = 'green';

// Call 'sync' to make the changed tag properties visible on the board.
await todo.sync();

// Output the updated tag to the developer console.
console.log(todo);
getMetadata(...)
(key: string) => Promise<T>
🚦 Rate limit: Level 1
Fetches board item metadata, stored per app, for the specified metadata key.
The response contains the metadata value assigned to the requested key.
To fetch all the metadata for a board item, invoke the method without passing any arguments.
The response contains all the metadata associated with the board item as key/value pairs.
An app can access only the metadata that it sets.
It cannot access metadata set by other apps.
getMetadata and setMetadata are available for the following board items:
- Card
- Connector
- Embed
- Image
- Preview
- Shape
- Sticky note
- Text
The methods aren't available for the following board items:
- Frames
- Unsupported board items
- groups
ℹ️ Note:
- To access board item metadata, apps require the
boards:readpermission. - To store board item metadata, apps require the
boards:writepermission. getMetadatareturns a new object, not a reference to the object that was previously set withsetMetadata.- If the specified key isn't found, the method returns
undefined.
⚠️ Warning:
- Total
ItemMetadatastorage limit:6 KBper item.
Example:
// Get the board item you want to retrieve metadata from.
const [geoCard] = await miro.board.get({type: 'card'});

// Set item metadata for an imaginary geocaching game, and store it to the retrieved card item.
await geoCard.setMetadata('leaderboard', ['Ziltoid', 'Howard', 'Paul']);

// Get the specific 'leaderboard' metadata from the card item.
const leaderboard = await geoCard.getMetadata('leaderboard');

// Get all the metadata from the card item by passing no arguments.
await geoCard.getMetadata();
setMetadata(...)
(key: string, value: title="Json">Json) => Promise<T>
Experimental
Adds board item metadata to make it available on the board that the app runs on.
An app can access only the board item metadata that it sets.
It cannot access metadata set by other apps.
Board item metadata is stored in the item it refers to. Therefore:
- When duplicating an item, the metadata is copied to the new item.
- When deleting an item, the corresponding metadata is removed with the deleted item.
Board item metadata is synced across, and available to, all the users who can:
- Access and view the board that the app is running on, AND
- Run the app on the board.
ItemMetadata is a key/value-pair object. It can contain values with the following data types:
stringnumberbooleanObjectArraynullundefined
getMetadata and setMetadata are available for the following board items:
- Card
- Connector
- Embed
- Image
- Preview
- Shape
- Sticky note
- Text
The methods aren't available for the following board items:
- Frames
- Unsupported board items
- groups
To overwrite an existing key inside ItemMetadata:
- Pass the same key multiple times with different values. Only the last/most recent value is stored with the key.
To remove a key from ItemMetadata:
- Set the value of the existing key to either
null, orundefined.
This clears the key. If you callgetMetadata(key)to retrieve a key that has been set tonullorundefined, the method returnsundefined.
ℹ️ Note:
- To access board item metadata, apps require the
boards:readpermission. - To store board item metadata, apps require the
boards:writepermission. - You can assign an empty array (
[]) to a key. It's returned as an empty array. - You can assign an empty string (
'') to a key. It's returned as an empty string.
⚠️ Warning:
- Total
ItemMetadatastorage limit:6 KBper item.
Example:
// Get the board item you want to set metadata to.
const [geoCard] = await miro.board.get({type: 'card'});

// Set item metadata for an imaginary geocaching game, and store it to the retrieved card item.
await geoCard.setMetadata('geoData', {
  name: 'null',
  coordinates: {
    latitude: '33.950278',
    longitude: '-105.314167',
  },
  lastFound: '1947-07-08',
  content: true,
  difficulty: 5,
  keywords: ['x-files', 'truth-is-out-there', 'area-51', 'roswell', 'aliens'],
  geoCache: [
    {
      name: 'UFO',
      description: 'Severely damaged unidentified flying object. ',
    },
    {
      name: 'Alien',
      description: 'Remains of an alien life form.',
    },
    {
      name: 'Artifacts',
      description: 'Tools, equipment, and other items found at the crash site.',
    },
    {
      name: 'Edibles',
      description: 'The alien was likely as high as a kite when they crashed. Typical.',
    },
  ],
});

// Get the specific 'geoData' metadata from the card item.
// The response contains the metadata value assigned to the key.
const geoCardGeoData = await geoCard.getMetadata('geoData');

// Get all the metadata from the card item.
// The response contains all the metadata assigned to the board item as key/value pairs.
const geoCardAllMetaData = await geoCard.getMetadata();

// Clear the metadata about the imaginary geocaching game in one of the following ways:
// 1. Assign 'geoData' an empty object.
await miro.board.setMetadata('geoData', {});
// 2. Set 'geoData' to 'undefined'.
await miro.board.setMetadata('geoData', undefined);
// 3. Set 'geoData' to 'null'.
await miro.board.setMetadata('geoData', null);
Updated over 1 year ago