Work with connectors
Connectors (Figure 1) are a great way to create diagrams, associate board items to each other, and map workflows in a flexible visual manner. Our REST API v2 currently supports connectors—a line that connects two items on a board, as described in our reference documentation. Connectors were called lines in REST API v1. In v2, we’ve renamed lines to connectors and added a few enhancements, such as the ability to add a caption to connectors, and the flexibility of specifying the point on an item where the connector is attached (x and y coordinates, or the side of the item where the connector must be attached to).
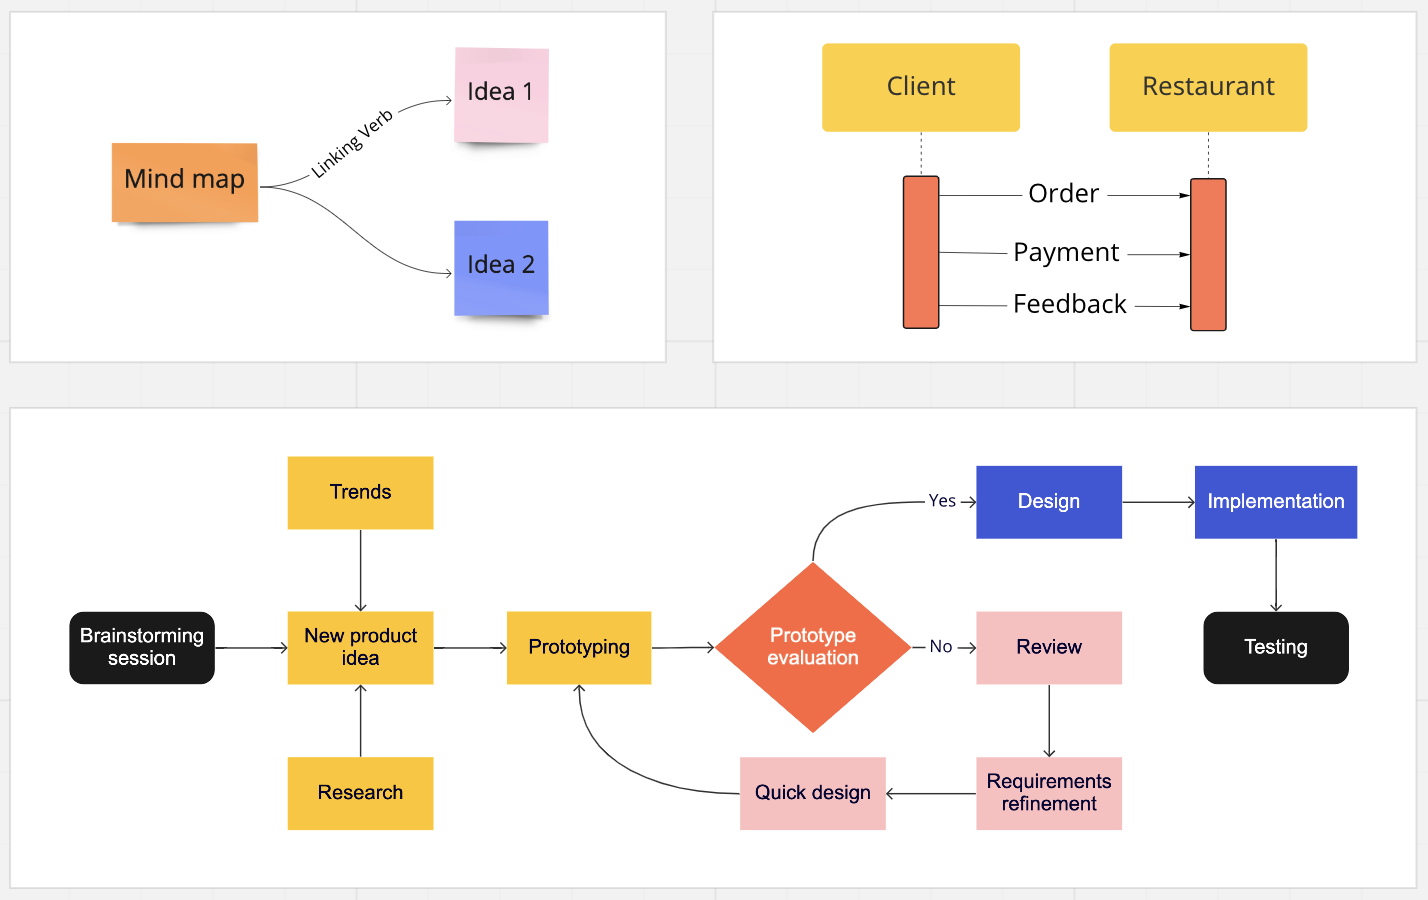
Figure 1. Sample diagrams using connectors.
This guide covers:
Migrating from v1 lines to v2 connectors
We’ve prepared several resources for migrating from v1 lines to v2 connectors. The best place to get started is our REST API Comparison Guide, where we outline the high-level updates for various items.
For more specific migration guidance, you can leverage our REST API Reference Guide. This includes side-by-side request samples to help you handle updating your requests.
Potential use cases
There are many ways to leverage connectors when integrating with Miro. Here we are sharing some practical applications of our REST connectors in various sample Miro integrations.
Use case 1: code to diagram
One application of connectors in Miro can be found in a code to diagram use case.
Such a use case involves using REST connectors to construct a diagram based on a desired input. For example, convert PlantUML code to a Miro diagram (leveraging v2 connectors to connect various elements).
Sample app: PlantUML to diagram
Figure 2. PlantUML to diagram.
This application leverages both the Miro Web SDK and REST API to demonstrate a Code > Diagram use case. More specifically, it is based on an open-source Plant UML library to draw UML diagrams from their textual description/code, and present it in Miro using our v2 REST connector endpoints as well as our Web SDK.
We've included this app among our examples specifically because of its use of our REST connector endpoints. To view the details of how the Miro REST API is called, see our supplementary guide:
App guide: code > diagram with Miro PlantUML
This is an in-depth, code-specific guide which is also a great starting point if you’re interested in exploring a similar implementation that might leverage a different third-party or open source tool.
Code:
View the open source project here.
Use case 2: lines and swimlanes
REST connectors can also be used to create standalone lines, swimlanes, or other organizational components of a workflow. Think of use cases such as adding columns and rows to construct your own kanban board, importing different verticals of data from a third-party tool, and more.
Sample app: REST sticky notes from CSV
Figure 3. REST sticky notes from CSV.
Using our v2 REST API, this app imports data from the rows of a CSV file, organizes it into sticky notes/tags, and uses connectors to create swimlanes on the Miro board. In this app, connectors have intentionally been used as a means to include some reference code, but note that our shapes endpoints could accomplish the same goal here, and can also provide a quick, functional way to create swimlanes for board items like this.
For the full code, see our project repo. You can also find the same code used to create these lines in the Edge cases and examples section.
Further inspiration
REST connectors can be used to add structure and associate board items in many different ways, and we’ve only just scratched the surface here in highlighting what is possible.
For example, if you’re creating an org chart in Miro, you can utilize our existing endpoints (in either the REST API or Web SDK) to create shapes, text, and more, and then assemble the components together and complete the chart using connectors. This can look something like this:

Figure 4. Further inspiration of using Miro REST API or Web SDK to create shapes, text, and more.
If you’re looking for more inspiration, keep an eye on our Example apps. We are continually adding examples for these and other top use cases.
Edge cases and examples
At the moment, connectors that do not connect two items are not supported. This means that if you want to create a connector on the board, it is a prerequisite that you first create two items to serve as the start and end points for the connector. You cannot use a connector to connect from an item to a random point on the board. You can only use a connector to connect two items on the board.
The following steps provide a good workaround for this use case:
- Create two very small items (such as circles) as your start and end points for a line. You can make the size of the circles small enough so that the shapes don’t serve a visual purpose on the board—just the functional purpose of providing a start and end point for your line.
Example:
// Example using Node.js.
// Create a shape to serve as the `startItem` or `endItem` for a connector.
import { MiroApi } from "@mirohq/miro-node";

const api = new MiroApi(oauthAccessToken);
const board = await api.getBoard("boardId");

const endpoint1 = await board.createShapeItem({
  data: {
    shape: "circle",
  },
  style: {
    borderColor: "#1a1a1a",
    borderOpacity: "1.0",
    borderStyle: "normal",
    borderWidth: "2.0",
    color: "#1a1a1a",
    fillOpacity: "1.0",
    fontFamily: "arial",
    fontSize: "14",
    textAlign: "center",
    textAlignVertical: "top",
  },
  position: {
    origin: "center",
    x: 0,
    y: 0,
  },
  geometry: {
    width: 5,
    height: 5,
  },
});- Make a second shape following the same format as
endpoint1above, to defineendpoint2. Note that we’ve specified the width and height as 5px (or less) to ensure the endpoints aren’t the focal point on our board. You can also consider choosing a smaller width/height, or a transparent color. - Now, create your line, and specify the non-intrusive shapes you’ve created as the
endItemandstartItemin your request to create a “connector”:
// This example uses the board object from the previous code sample.
const connector = board.createConnector({
  endItem: {
    snapTo: "auto",
    id: endpoint2.id,
  },
  shape: "straight",
  startItem: {
    snapTo: "auto",
    id: endpoint1.id,
  },
  style: {
    color: "#1a1a1a",
    fontSize: "14",
    strokeColor: "#000000",
    strokeWidth: "1.0",
    startStrokeCap: "none",
    endStrokeCap: "none",
  },
});
You can find the full implementation of the v2 connectors endpoint for this use case in the Rest sticky notes from CSV sample app here.
Further exploration
For more in-depth examples and further exploration of the use cases outlined in this guide, we encourage you to take a look at each of these projects in more detail. You’ll find details on how and where v2 connectors are leveraged in each app’s README.md.
Find these, and other app examples, in our Github Repository.
Updated 4 months ago
What's next
To discover and to get acquainted with more Web SDK features, check the other tutorials.