Deploy a Miro app
Learn how to host your app publicly and distribute it through Miro's Marketplace.
To discover and to get acquainted with more Web SDK features, check the other tutorials. The Miro Developer Platform allows teams to extend Miro's functionality in new and exciting ways. From useful integrations, to apps that allow you to work in Miro more efficiently—Miro Developer Platform is built to enable developers and teams to build the next big thing.
If you haven’t built on top of the platform before, make sure you check out this getting started guide to build your first app.
If you follow our guides and example apps as you develop an app in Miro, you’ll quickly realize that they reference local development: the apps you create will only be available to you as a developer, as you build your app.
If you want to distribute your app to others, you’ll need to deploy or host your app somewhere, so it’s available to your users and not just locally on your machine.
The rest of this guide goes through the steps you can take after building an app locally, and how you can distribute your app through Miro Marketplace.
Prepare your app for production
Making your app production-ready can involve a few different steps. This section highlights the important steps you’ll need to follow to use your app in Miro.
Remove console.log
console.logLogging out errors or information to the browser console is a very common pattern that many developers use to help debug their apps when developing. While useful in the development process, it’s generally a good idea to remove any console.log calls you have in your app before deploying your app to production.
It will clean up your code, and leave fewer traces of development for your users down the line. If you’ve started your app from create-miro-app, your app uses Vite under the hood, which takes care of this for you when you build your app for production.
Remove authentication tokens
If your app connects with other third-party tools or applications, chances are that you’ll need an authentication flow set up in order for your app to work with these other services.
While developing your app, you may have coded these authentication tokens directly into your app. You’ll want to double-check that you’re not exposing any information or authentication tokens that others could use. A common practice that you might consider leveraging would be to include a dedicated file to store your environment variables, such as an .env file.
Build your project for production
With some projects, developing locally might mean that you’re using certain development flags or features. Before deploying your app, you’ll want to make sure that you’ve built your project for production.
If you’ve started your project from a template on create-miro-app, you already have an available script (npm run build) that builds a production-ready version of your app that you can deploy right away. These templates are built on top of Vite, which handles some steps to help you prepare your app for production.
If you’re interested in learning more, there are plenty of other resources available to continue learning about creating production ready apps.
Deploy your app
After you’ve cleaned up your app and gotten it ready for production, it’s time to deploy it to a service to make it available for others in Miro.
First, choose a service you want to deploy your project to. There are a number of different options available, depending on your preference and setup.
Below we have three videos outlining how to deploy a Next.js Miro app to three services. We have video tutorials for Netlify, Microsoft Azure, and AWS Amplify. We also have a open-source repo showing how to deploy to AWS CDK.
Watch the video (Deploy your Next.js Miro app to Netlify)
Watch the video below to learn how to deploy your Next.js Miro app to Netlify. It shows how to deploy the Next.js OAuth app example including how to deal with environmental variables.
Watch the video (Deploy your Next.js Miro app to Microsoft Azure)
Watch the video below to learn how to deploy your Next.js Miro app to Microsoft Azure using the Static Web App service. It shows how to deploy the Next.js OAuth app example including how to deal with environmental variables.
Watch the video (Deploy your Next.js Miro app to AWS Amplify)
Watch the video below to learn how to deploy your Next.js Miro app to AWS Amplify. It shows how to deploy the Next.js OAuth app example to AWS Amplify, including how to deal with environmental variables.
Deploy a Miro React app to AWS CDK
See this AWS-sample open-source repo to learn how to Deploy a Miro React app to AWS via the AWS CDK.
Additional Services
Below you can find a list of available services with options to deploy your app for free. Log in with your git provider, select your project’s repository, and deploy!
Each of the services below have their own documentation on deploying a project, so make sure you head to their documentation to learn more.
- Vercel: https://vercel.com/
- Netlify: https://www.netlify.com/
- Heroku: https://www.heroku.com/
- Fly: https://fly.io/
Note: there are many services that you can use, the list above is a small snippet of some possibilities.
Disclaimer: there are also hosting sites that will not work, like GitHub Pages. For more information, see the GitHub changelog.
After deploying your app to one of the services above, you should end up with a URL that points to your project. Opening the URL should show you the app you’ve built!
Now that you have a URL that points to your project, all you need to do is finish up your app’s configuration in Miro.
Since you’ve developed this app in Miro, you should already have an app created in the app section in your user profile.
Heading into your app’s settings, you’ll be able to update your App URL to the newly created URL we got earlier.
After hitting Save, your app will be live and available to anyone who you’ve shared your app with!
Public vs private app URL
- If you're developing locally, you can use
localhostand HTTP.
Example:http://localhost:3000/- If you set a URL that is part of a LAN or a VPN, the app is available to all users who can access the LAN or VPN.
In this case:
- The app isn't publicly available through the internet.
- It's not possible to register Miro webhooks with a non public URL.
- If you set a URL that is publicly accessible on the internet, the app is available to any users who can access the URL.
In this case:
- The app is publicly available through the internet.
- It is possible to register Miro webhooks with a public URL.
Share your app
Now that your app is deployed and configured, you’re able to share it with others, so they can use it in their own Miro boards.
The easiest way to share your app is via the Installation URL you will find at the bottom of your app’s setting page, under Share app.
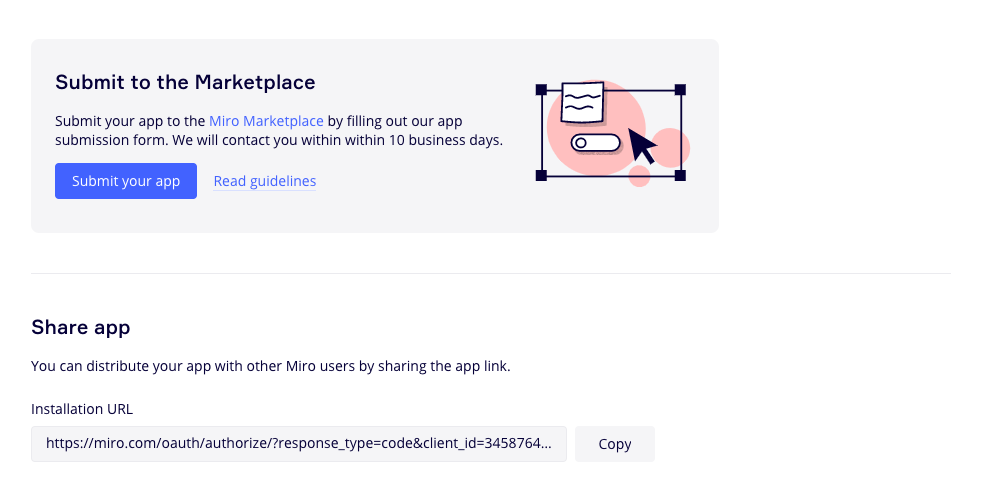
Users with this link can install your app to a Miro team! Any updates you deploy to the version you launched earlier will automatically be applied.
Submit your app to Miro Marketplace
Once you've made the decision to publish your Miro app, your first step is to fill out the partner interest form. After that, you'll get a form to be able to submit your app.
In addition to sharing your app via URL, you can submit your app to the Miro Marketplace, so it’s easily discoverable.
All app submissions are reviewed prior to approval.
Let's wrap up
Creating apps in Miro is fun, and it allows you to unlock powerful new features that can supercharge the way you work in Miro.
Whether you’re developing an app for yourself, your team, or for everyone else, Miro’s platform contains all the tools you need to start building your next idea—Big or small.
Make sure you check out our other guides if you’re interested in learning more about Miro Developer Platform!
Updated 3 months ago
What's next
To discover and to get acquainted with more Web SDK features, check the other tutorials.