Integrate a digital asset manager in Miro
Make the images, logos, and other assets you need available directly in a Miro board, when you need them.
Overview
The Miro Developer Platform empowers teams to build integrations with their favorite tools, and to unlock new use cases and workflows that weren't possible in Miro before.
A use case that we notice is becoming popular focuses on integrating their digital assets directly in Miro.
You may be familiar with the situation: you’re working in Miro, you need access to your brand’s logo or an illustration, but can’t remember where it’s stored, or need to open multiple tabs to find what you’re looking for.
Integrating a digital asset manager into Miro allows you and your team direct access to the assets you need, without needing to leave Miro, or endlessly search through multiple tabs and folders.
Digital asset management
Digital asset management (DAM) systems help organizations to store, organize, find, retrieve, and share their entire digital content catalog from one authoritative place, also referred to as a single source of truth.
Quick to deploy and easy-to-use, a centralized DAM system provides peers, employees, clients, contractors and other key stakeholders controlled access to their entire digital content library—including images, photos, creative files, video, audio, presentations, documents, and more.
Goal
This guide helps teams understand the different pieces that go into building a DAM integration in Miro.
At Miro, we’ve built and open-sourced our DAM integration with Bynder, and will dive into the main features below to help you better understand where the different features live and how you can set them up for you and your team.
Implement a DAM tool for your organization
Chances are your company might already be using a DAM solution that provides a way for you to integrate it into other tools and services.
The DAM we're walking you through in this guide uses Bynder, but there's plenty of alternatives. Other popular DAMs include:
- Canto
- Brandfolder
- Widen
- Celum
- ...and many more
Many of these tools provide an API that enables authenticating users and pulling assets, so you can use them directly in Miro.
To learn more about using your own tool for connecting your assets into Miro, skip to the bottom to learn more about the technical requirements needed to set this up with a different technology.
Now that we’re more familiar with what a DAM is, let’s dive into the different pieces that make it possible to integrate with Miro.
Get started
We've written this guide based on our own integration with Bynder, and have the full code available in our app examples. Before we dive in, let's have a closer look at the app features we're touching upon in this tutorial.
The app example contains many features that we’ll explore more in detail by diving into the different files and functions that this example implements to build an asset manager.
Let's start with an overview of the tech-stack used in the app example:
App tech stack
| Technology | Description | Configuration file |
| Vite |
Vite is a frontend build tool that significantly improves the frontend
development experience by providing out-of-the box features for quick app
development. If you're building Miro apps based on create-miro-app
, Vite bootstraps the project.
|
vite.config.js |
| TypeScript | TypeScript is a strongly typed programming language that builds on JavaScript. | tsconfig.json |
| React | A JavaScript library for building user interfaces. | - |
| React Router | React Router is a lightweight, fully-featured routing library for the React JavaScript library. | - |
| Miro Developer Platform (Web SDK) |
A full-fledged JavaScript/TypeScript Web SDK to build apps that interact with Miro boards to enhance the user experience. | - |
| Bynder API | Bynder's DAM API enables developers to build their Bynder-powered applications based on a large set of features and functionality. | netlify/functions/* |
| Netlify | A cloud computing service that offers hosting and serverless backend services for web applications and static websites. | netlify.toml |
| Netlify functions | Server-side code that works as API endpoints deployed on the Netlify ecosystem. | netlify/functions/* |
Implement OAuth 2 authentication from Bynder
The first feature we’ll dive into is implementing an OAuth 2 flow with Bynder’s API. This will allow users to get the correct access they need to retrieve collections and assets.
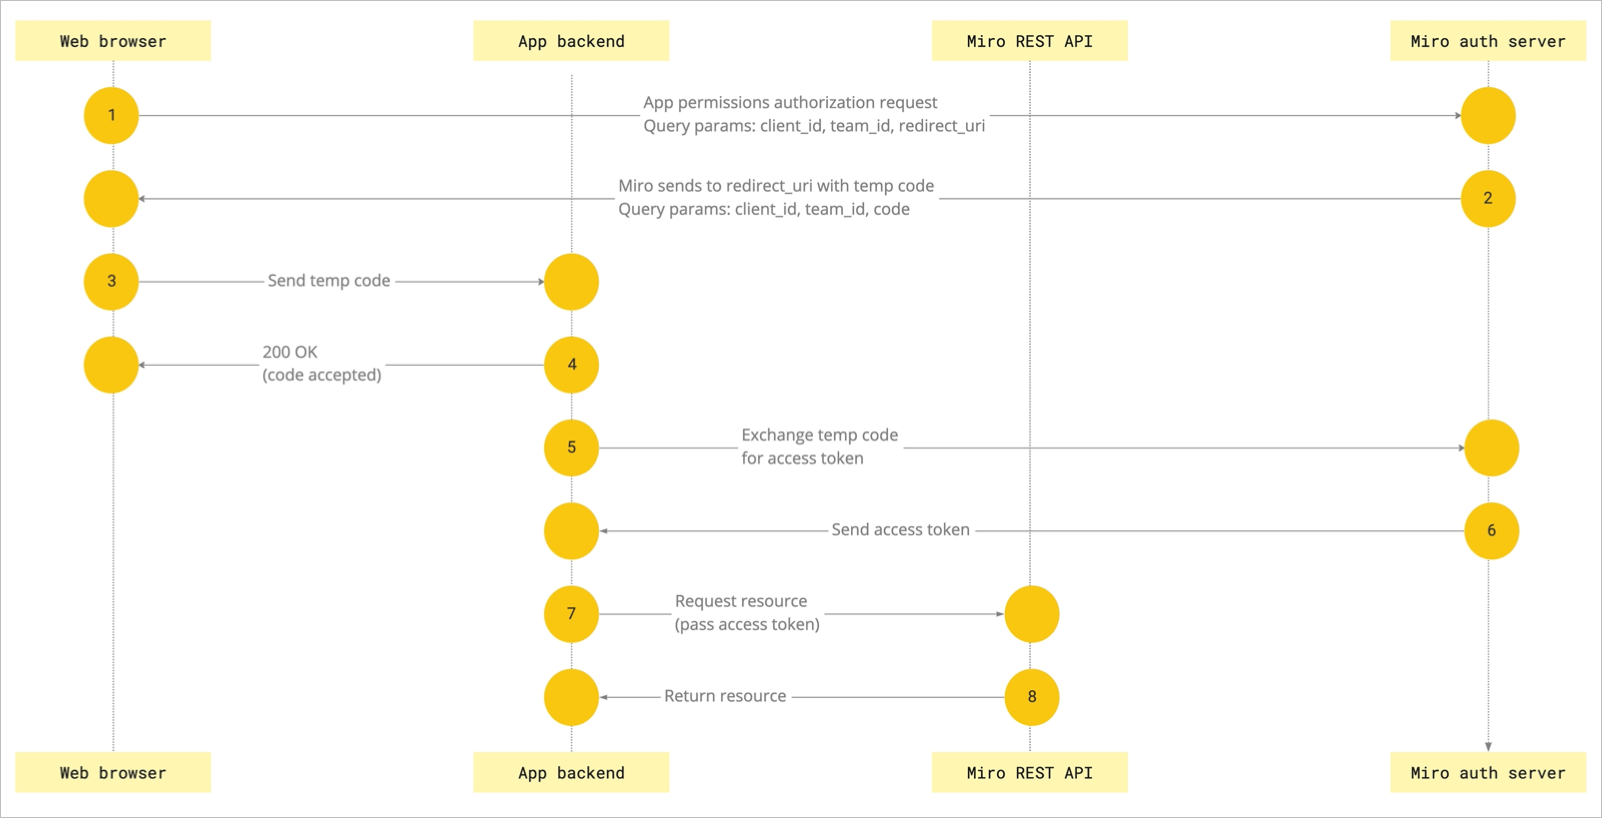
Figure 1. OAuth 2 code grant authorization flow between an app backend and the Miro auth server.
Here’s what the flow looks like:
Figure 2. The animated image shows the authorization flow on the board UI.
The reason we need to set this up is because we want to make sure that people who use this app have access to the assets we’ll be using—and signing in is the perfect way to verify that.
Chances are if you’re implementing an OAuth2 flow for a different technology, the structure of the code will be the same, the only difference being that the authorization endpoints may vary, depending on the technology you’re using.
Where things are
All of the authorization pieces have separate API endpoints. In the app example, these endpoints are inside the netlify directory.
Start the flow
The flow starts in netlify/functions/signin.js. When users click the sign in button, the action calls the endpoint defined in authorizationURL.
This endpoint generates a URL for signing in to Bynder, and it opens it in a new window.
Upon a successful outcome, it also generates a code for the next endpoint in the flow.
Redirect
After the user successfully signs in, the second endpoint netlify/functions/redirect.js is called with a generated code received by the signin.js endpoint in the previous step.
Get the access token
The code is exchanged for an access token and a refresh token in the netlify/functions/redirect.js endpoint. \ The tokens are stored in the user’s browser cookies.
Subsequent calls to the Bynder API will use the tokens stored in the cookies.
Fetch collections and assets from Bynder via the Bynder API
Now that we’ve set up our user authentication, we have a valid auth token we can use to fetch assets and folders from the Bynder API.
Before we can insert anything, we need to fetch all of our collection folders from the Bynder API. You can do this by calling the collection endpoint netlify/functions/collections.
We’ve already stored our auth token in our cookies, so all we need to do is make sure we pass the auth token to our API call.
If you're using a different technology, you may need to tailor this endpoint to the technology you’re using. For example, this app example contains different categories fetched from Bynder, but the technology you’re using may not have folders or categories.
Drag and drop assets
Figure 3. The animated image shows dragging items from the app panel and dropping them on the board.
In this app example, you can drag assets from the app panel to your Miro board, where they are inserted as images.
We define the drag and drop behavior in panel-main.tsx.
For this function to work, we need to assign the item we want to insert the following CSS classes:
miro-draggabledraggable-item
We’ve defined that for all of the images being rendered in the app panel in Assets.tsx.
For more information about this feature, we have a more in-depth guide on setting up drag and drop in your Miro Web SDK apps.
Search and filter assets
Figure 4. The animated image shows searching items in the app panel.
In addition to organizing assets by their collection, this app includes a feature that lets you search and filter assets by their name.
We also have a specific guide on setting up search and filtering in your Miro SDK apps to help you get started.
Explore assets in multiple app views
We built this example with React and TypeScript. This allows us to easily render different views and components for the different sections of our app.
For example, this app contains a few different “main” views:
- Sign in page (
BynderSignIn.tsx&Home.tsx) - All collections (
Categories.tsx) - Specific collection (
AssetView.tsx)
We’re using React Router to render specific views, depending on the current route (location).
We start by defining our routes in our main panel, in the Panel.tsx file. Then, depending on the route, we render either the Home view, or the AssetView view.
Diving into the Home component, we can see that it features a check to see if we're signed in or not. This allows us to dynamically render either a sign-in button; or, if we're already signed in, the categories component.
The categories component in the Categories.tsx file contains the logic to fetch information about categories, and it renders a list view of Category Rows (CategoryRow.tsx).
If we click one of the Category Rows, the action directs us to a different route, and it renders a different view (originally defined in Panel.tsx).
For example, if we're looking at a list of categories, and if we click one of them, the route (URL) changes to:
<https://asset-catalog.netlify.app/{collectionName}/{collectionId}>
In this URL, collectionName is the name of the collection we clicked, and collectionId is the corresponding ID pulled from Bynder.
If we click the row and navigate to this route, the action changes the view to our AssetView.tsx component.
Then, we read the information about the collection name and collection ID from the URL parameter, as defined in AssetView.tsx, and we use this information to fetch the assets in the collection from Bynder.
In Assets.tsx we list the files based on the collectionId we pulled from the props. We obtain the value from the route/URL we parsed).
Load states
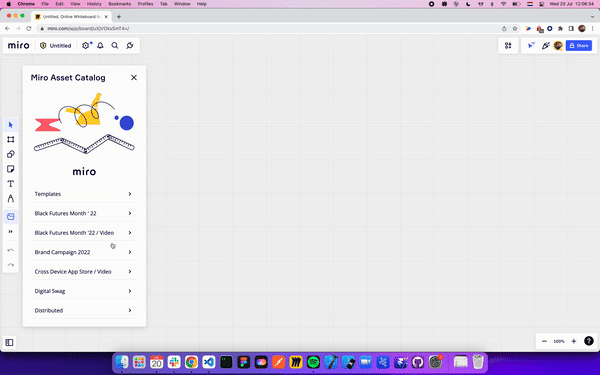
Figure 5. The animated image shows the loader icon while the app is still fetching items to display on the panel.
Another important feature in this app is a loading state, for when we're fetching assets from Bynder.
Fetching assets from Bynder can sometimes take a few seconds; while we're pulling the assets into our app, we need to provide visual feedback to our users to notify that the app is still working on fetching the assets.
For this, we created a loading component. You can find it in Loader.tsx.
For all the views we need to fetch data from—namely, Assets.tsx and Categories.tsx—we have a flag for the app to detect if we're still fetching the assets or not.
If the app hasn't completed pulling all the information we need, we show our Loader, instead.
Integrate assets in Miro with a different DAM
If you’re using a different technology than Bynder for storing your assets, this guide may still be relevant for your use case.
If you plan on using a different DAM and would like to integrate it into Miro, there are a few things to keep in mind. 👇
Image URLs
When we insert an image in a Miro board, we need to insert it with the source pointing to a URL.
This means that:
- The images you insert in Miro must be hosted via the DAM you're using.
- The URLs the images are hosted under must be returned from the API you’re using.
OAuth 2
OAuth2 has been implemented in this example, as the assets we’re pulling from Bynder are only accessible to users with the appropriate access level. By enforcing an OAuth 2 signup flow, we make sure that even if someone has installed the app from outside the organization, they cannot access the assets without signing in first.
Refresh tokens
By default, the access token returned from the Bynder API is only valid for 1 hour. This may be the case for the technology you’re using as well. For example, Miro’s OAuth 2 flow works the same way.
In this example, when the user signs in for the first time, a refresh token is also provided and stored in the cookies. If by the time the user tries to use any of the assets from the API the access token has expired, we first regenerate a valid auth token using the refresh token under the hood.
Let's wrap up
Integrating a digital asset manager into Miro is possible with most DAM providers, as long as they have an API that's available for you to use.
Go to our GitHub repo to explore many more examples of other apps built using the Miro Developer Platform.
Make sure to join our Developer Community to learn more about the Miro Developer Platform and chat with other Miro developers.
Updated 4 months ago
What's next
To discover and to get acquainted with more Web SDK features, check the other tutorials.