Enable 2-way sync between app cards and GitHub cards
Use the Miro REST API and Web SDK to build an app that enables syncing data between Miro app cards on a Miro board and connected GitHub cards on a GitHub project board.
Overview
The Miro Developer Platform empowers teams to build integrations with their favorite tools, and to unlock new use cases and workflows that weren’t possible in Miro before.
App cards offer customizable features that allows developers to create custom representations of data in other productivity tools, such as Asana, Monday, ClickUp, GitHub, and many more.
This guide walks you through building a working app example that implements an integration with GitHub and Miro.
While many of the code snippets are specific to the integration with GitHub, the guide focuses on key workflows common to most apps built with the goal of keeping the data between Miro and other tools in sync.
Goal
You'll learn to implement typical features to sync data between a Miro board and an external tool, such as:
- OAuth 2 code grant authorization flow.
- Implementing data sync.
- Polling data from the data source to reflect the information in the corresponding app cards.
- Executing CRUD operations on app cards.
- Storing user and card information in a database
Get the complete sample app to enable 2-way sync between Miro app cards and GitHub cards from our GitHub repo.
Get the complete sample app to enable 2-way sync between Miro app cards and GitHub cards on our GitHub repo.
Prerequisites
Before you begin, make sure that:
- You have a Miro account.
- You're signed in to Miro.
- Your Miro account has a Developer team.
- Your development environment includes Node.js 14.15 or a later version.
Moreover, you need the following sets of credentials:- App IDs:
- Client ID
- Client secret
- App ID
- OAuth access token
- A GitHub account.
- A Supabase account (for data persistence in a database.)
- A Netlify account (to host the app.)
- App IDs:
App tech stack
To get a deeper understanding of how the entire app works, let's have a look at the different technologies used in this example, and how they relate to the features we’ll be diving into in the rest of this guide.
Architecture diagram
Explore the board to view architecture diagrams that illustrate the workflows:
Tech stack
| Technology | Description | Configuration file |
|---|---|---|
| Vite | Vite is a frontend build tool that significantly improves the frontend development experience by providing out-of-the box features for quick app development. If you're building Miro apps based on create-miro-app, Vite bootstraps the project. | vite.config.js |
| TypeScript | TypeScript is a strongly typed programming language that builds on JavaScript. | tsconfig.json |
| React | A JavaScript library for building user interfaces. | |
| Miro Web SDK | The Miro Web SDK is a full-fledged JavaScript/TypeScript Web SDK to build apps that interact with Miro boards to enhance the user experience. | |
| Miro REST API | The Miro REST API features predictable and resource-oriented URLs, and it uses HTTP response codes to indicate API errors. The REST API enables connecting a Miro board to a third-party product. | |
| Mirotone | Mirotone CSS components is a base library that enables everyone to design and build their Miro apps. The framework aims to provide ready-to-use frontend components that you can incorporate into your Miro app. | |
| Netlify | A cloud computing service that offers hosting and serverless backend services for web applications and static websites. | netlify.toml |
| Netlify Functions | Server-side code that works as API endpoints deployed on the Netlify ecosystem. | netlify/functions/* |
| GitHub REST API | GitHub APIs enable interacting with GitHub repositories, branches, projects, issues, pull requests, and so on. The Miro app cards <-> GitHub cards integration uses the GitHub Issue API and the GitHub Project API. | |
| Supabase | Supabase is an open source Firebase alternative. It provides all the backend services you need to build a product, such as file storage, database, and observability. |
In addition to the different technologies used, it’s helpful to know more about the entities associated with the related tools, and where to find more information about them.
Glossary
| Entity | Description | Tool |
|---|---|---|
| App card | A customizable card in Miro that lets you design and define fields, appearance, and the modal used to edit the card in detail view. | Miro |
| Sticky note | Represents a sticky note on a board. Useful to take quick notes while brainstorming and to drive design thinking sessions. | Miro |
| GitHub repository (repo) | A GitHub entity that contains all information and data related to the integration in reference. | GitHub |
| GitHub issue | A GitHub entity that is used for tracking bugs, tasks, or other information related to a GitHub repository. | GitHub |
| GitHub project board | A GitHub entity related to a GitHub repository that allows you to track issues, tasks, and other information in a Kanban style format, focused on tracking tasks across time as they are completed. | GitHub |
| GitHub project card (card) | A GitHub entity that is used to describe an item on a project board. It's possible to connect a project board card to an issue. | GitHub |
| GitHub Actions | A GitHub action is a snippet of code that runs when different parts of our repository are updated. | GitHub |
GitHub issue
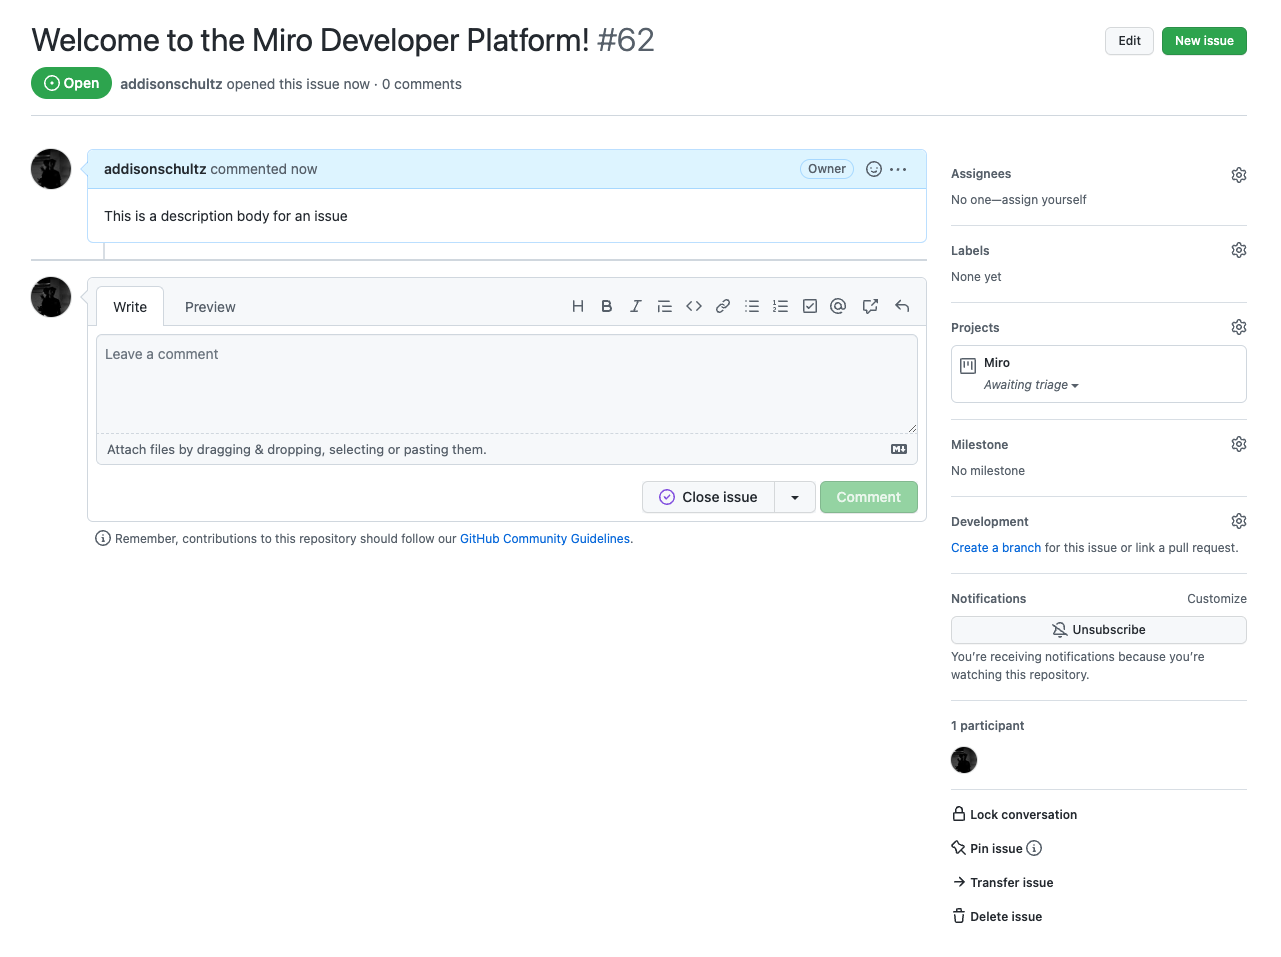
Figure 1. A GitHub issue as displayed on the GitHub UI.
A GitHub issue is a feature that lets you track your work on GitHub.
GitHub project
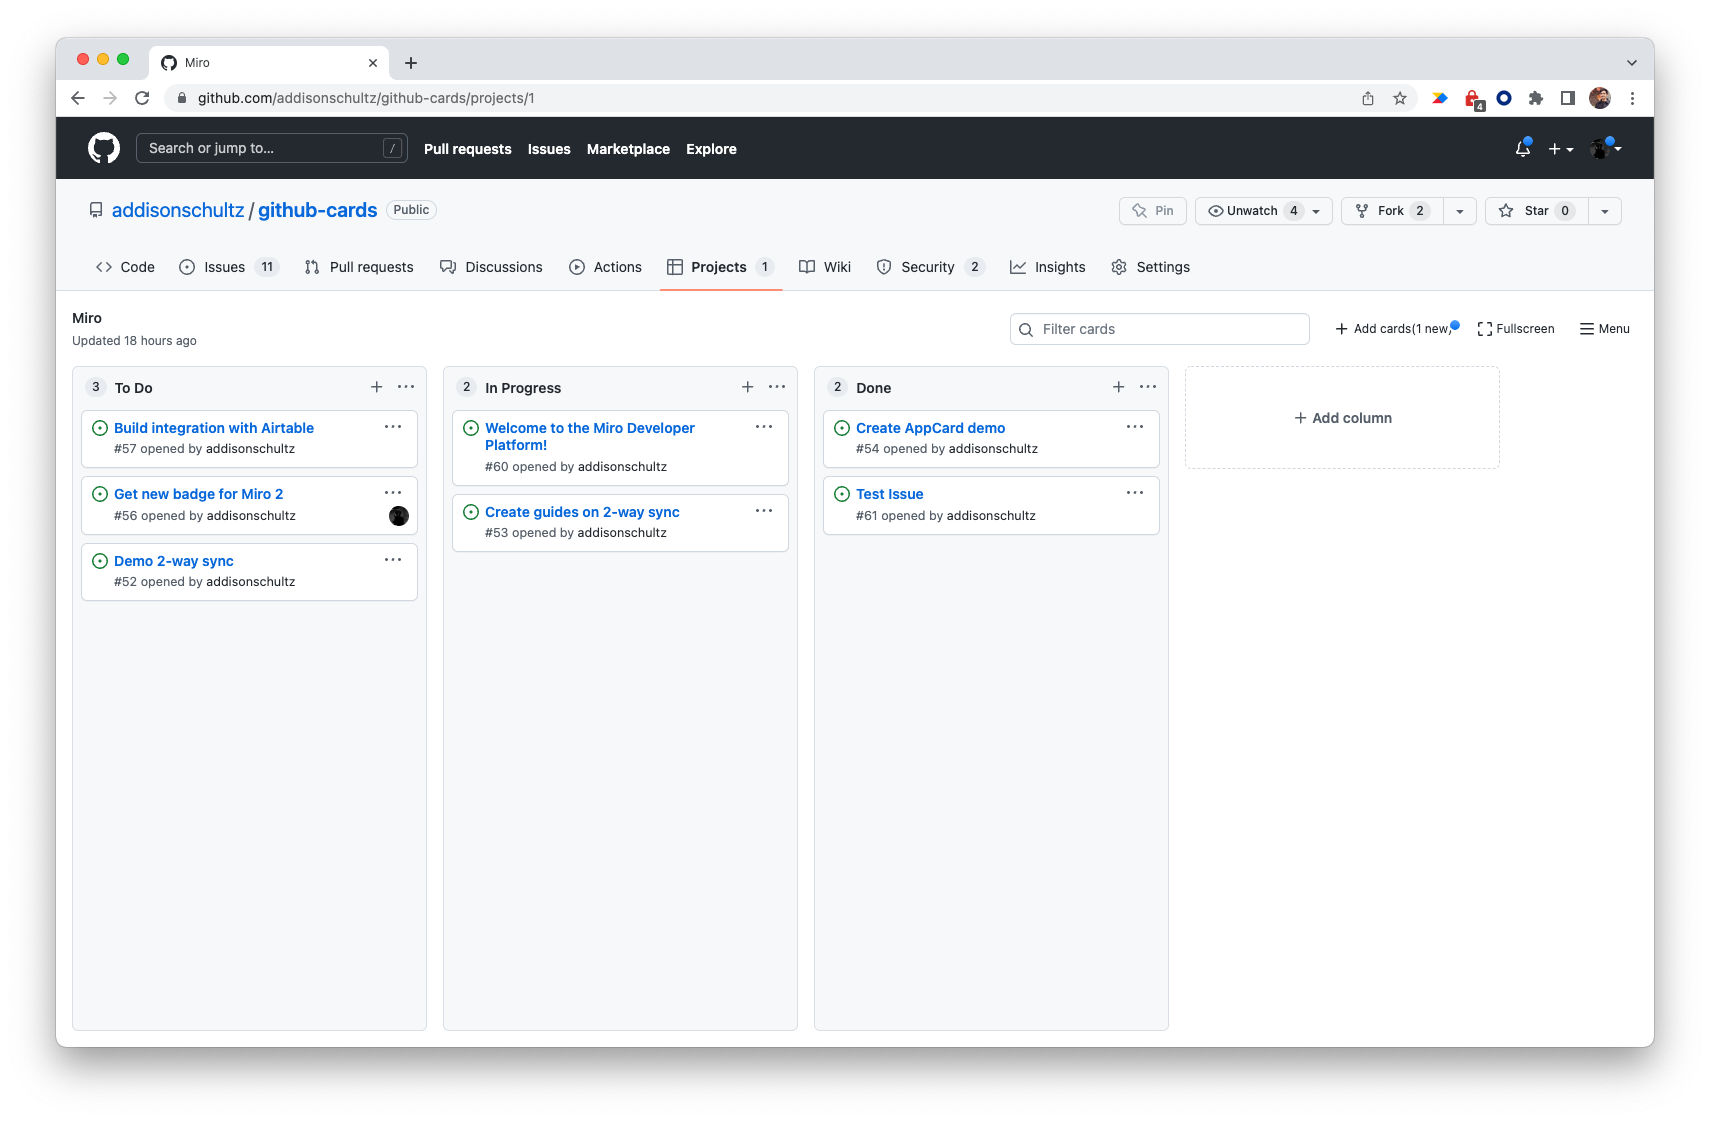
Figure 2. A GitHub project as displayed on the GitHub UI.
A GitHub project is a part of a GitHub repository made up of issues, pull requests, and notes that are categorized as cards in columns of your choosing. You can drag and drop or use keyboard shortcuts to reorder cards within a column, move cards from column to column, and change the order of columns.
GitHub project card
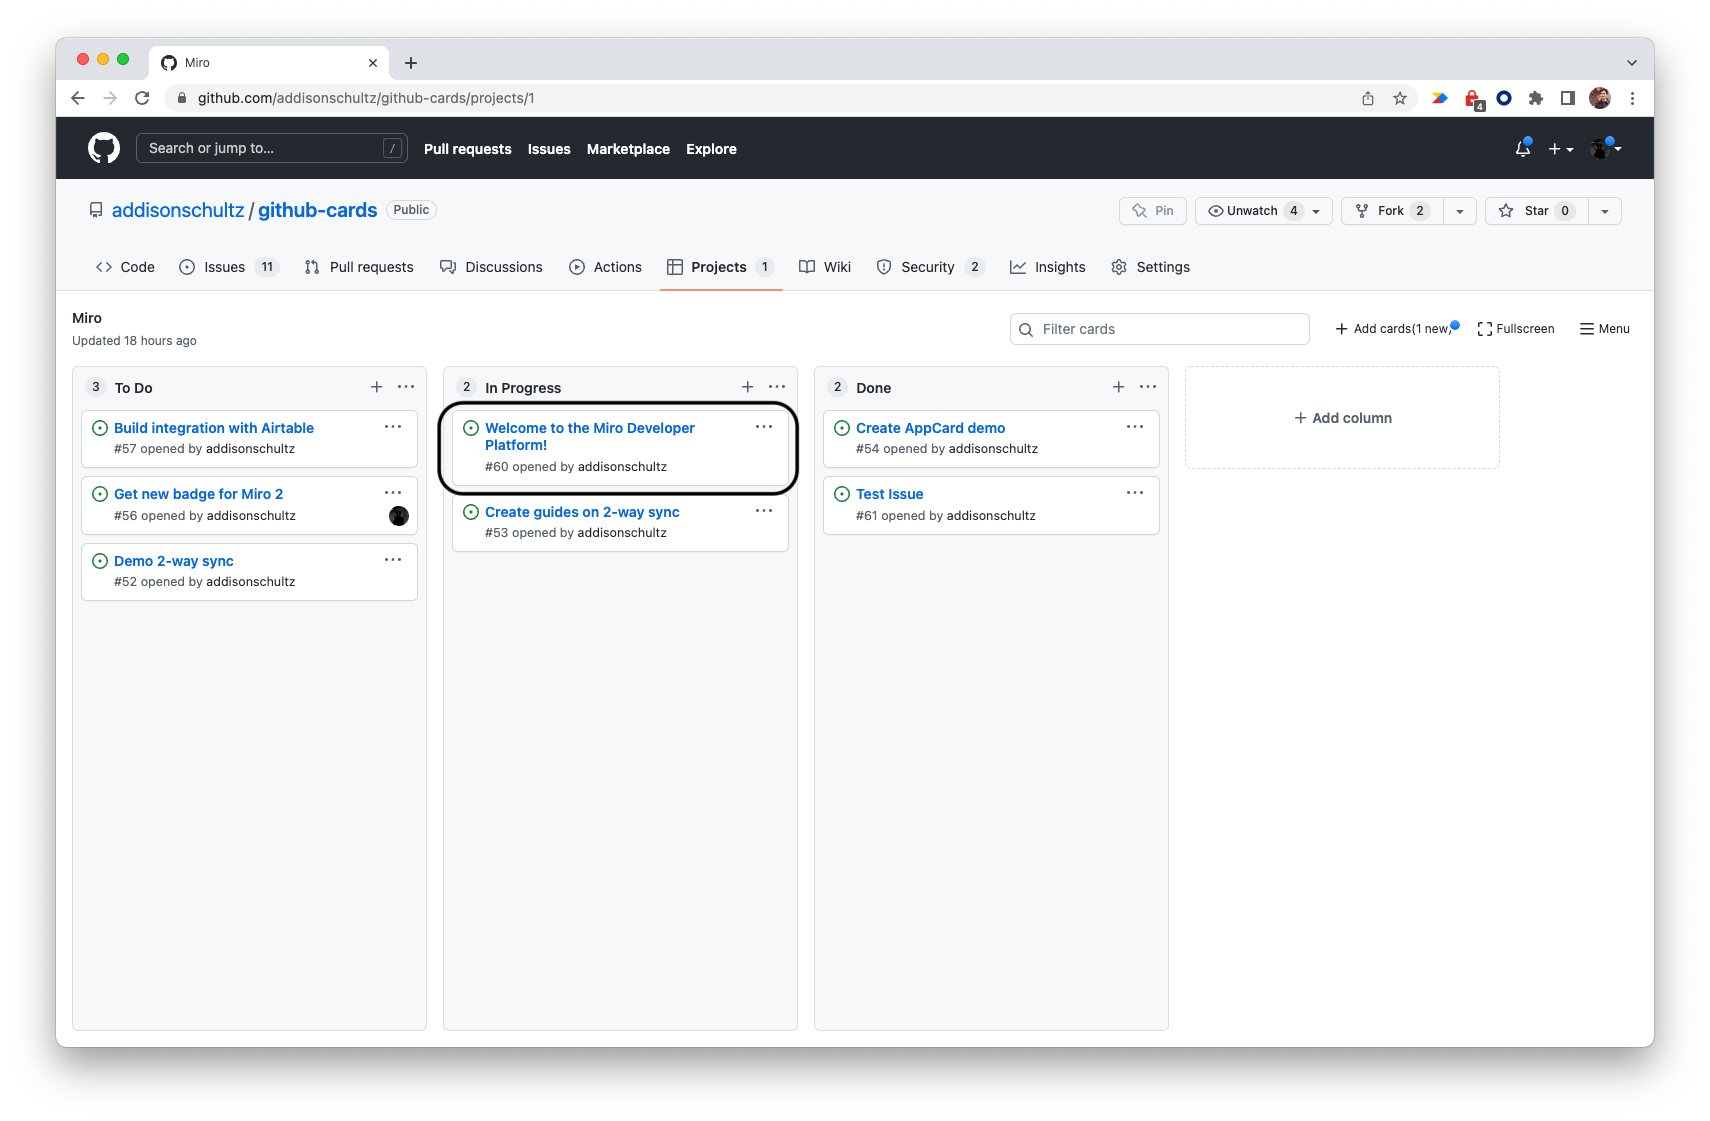
Figure 3. A GitHub project card as displayed on the GitHub UI.
A GitHub project card is an item that lives in a GitHub project. It's possible to link project cards to existing GitHub issues.
GitHub Actions
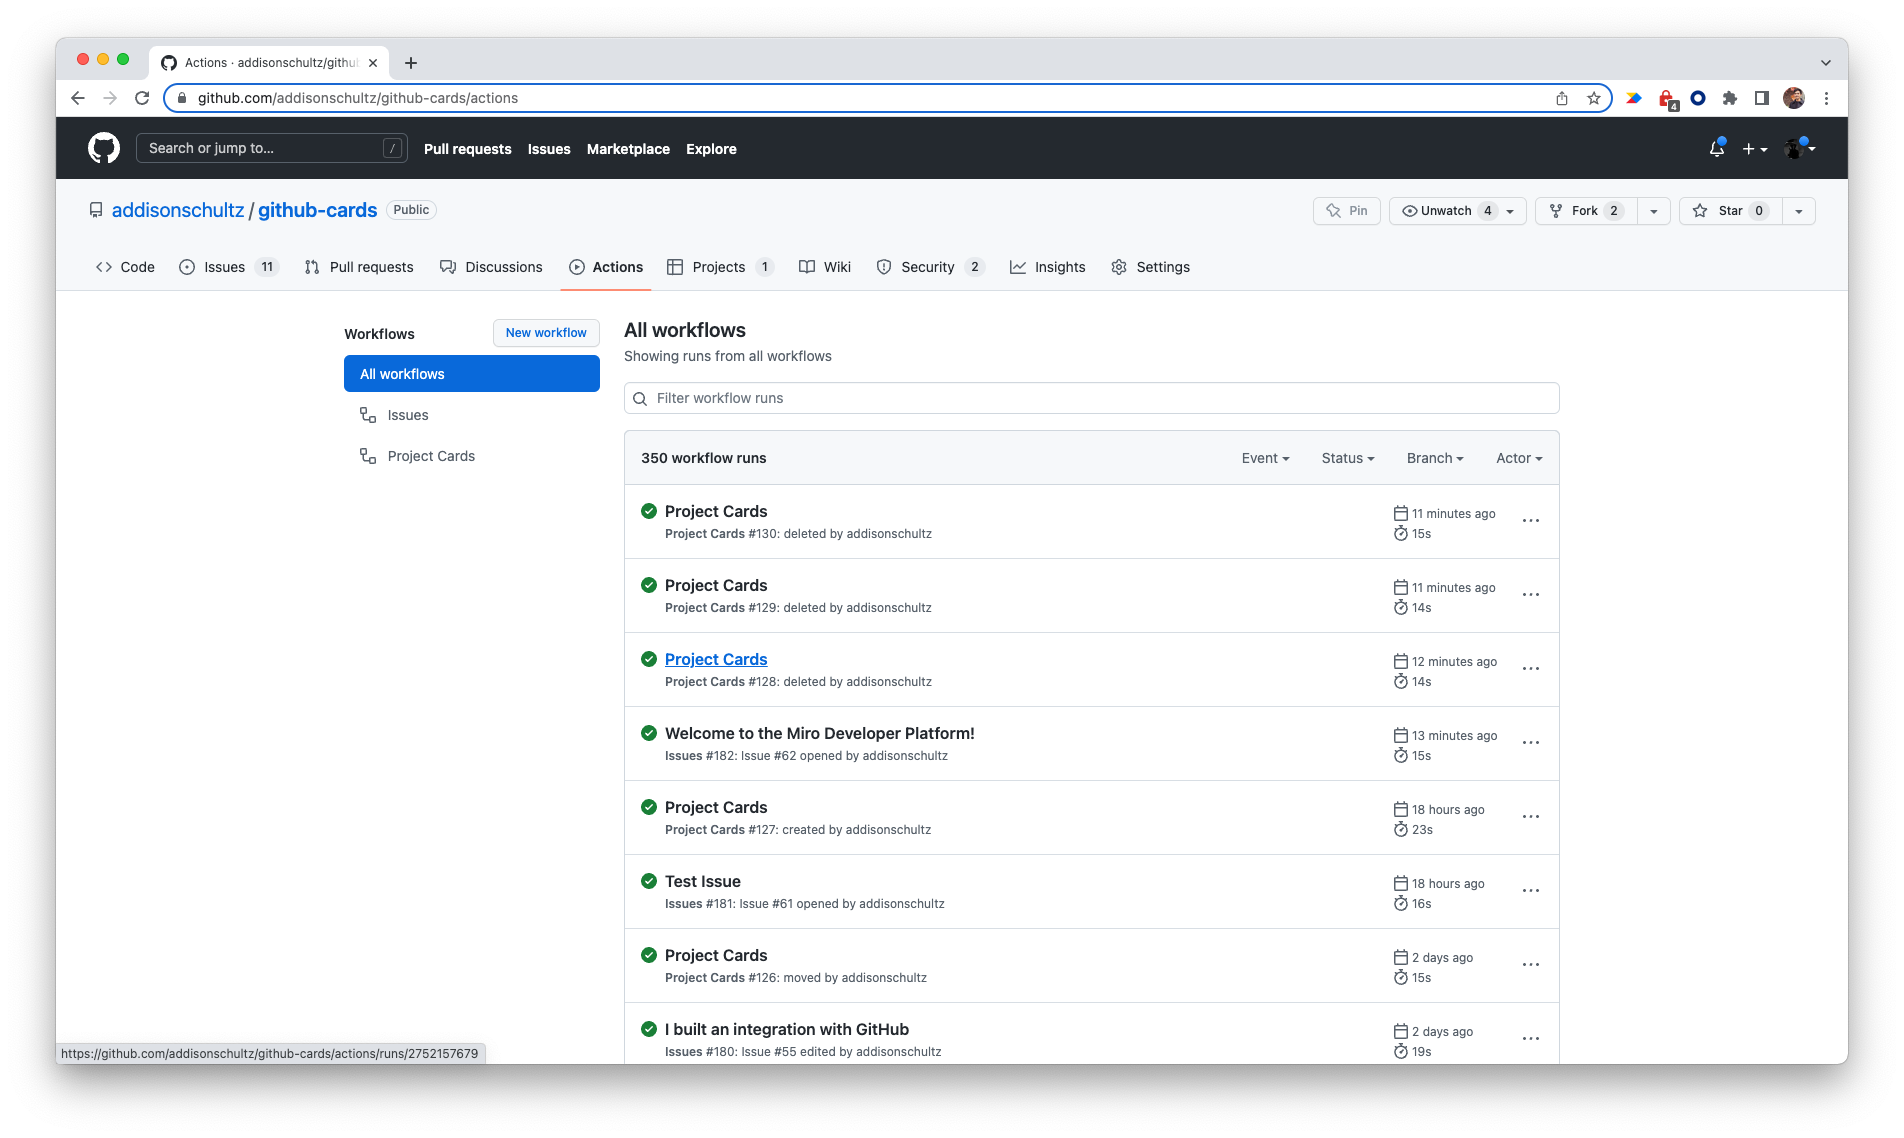
Figure 4. A GitHub Action as displayed on the GitHub UI.
A GitHub action is a snippet of code that runs when something happens in our repository. Acting like a webhook, this allows us to automatically manage our data as our project is updated.
Miro app card
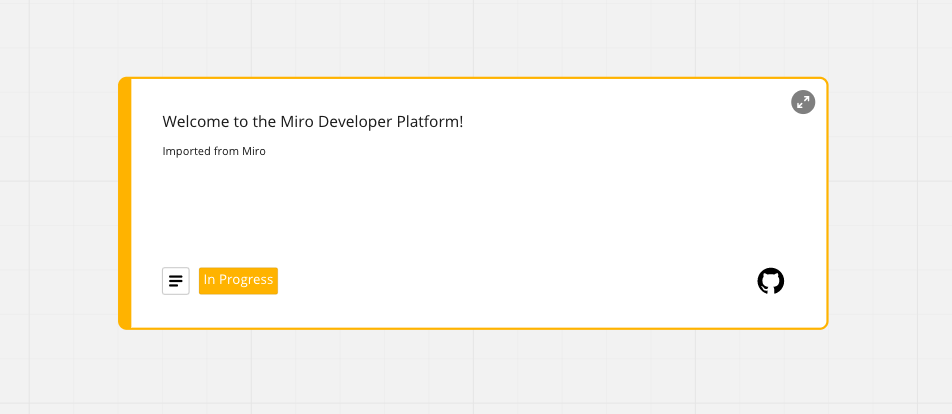
Figure 5. A Miro app card as displayed on a Miro board.
Miro app cards are customizable cards in Miro, with added features such as custom fields and colors.
They enable synced information exchange with a similar data source, such as a card or a ticket, in an external application.
Netlify Functions
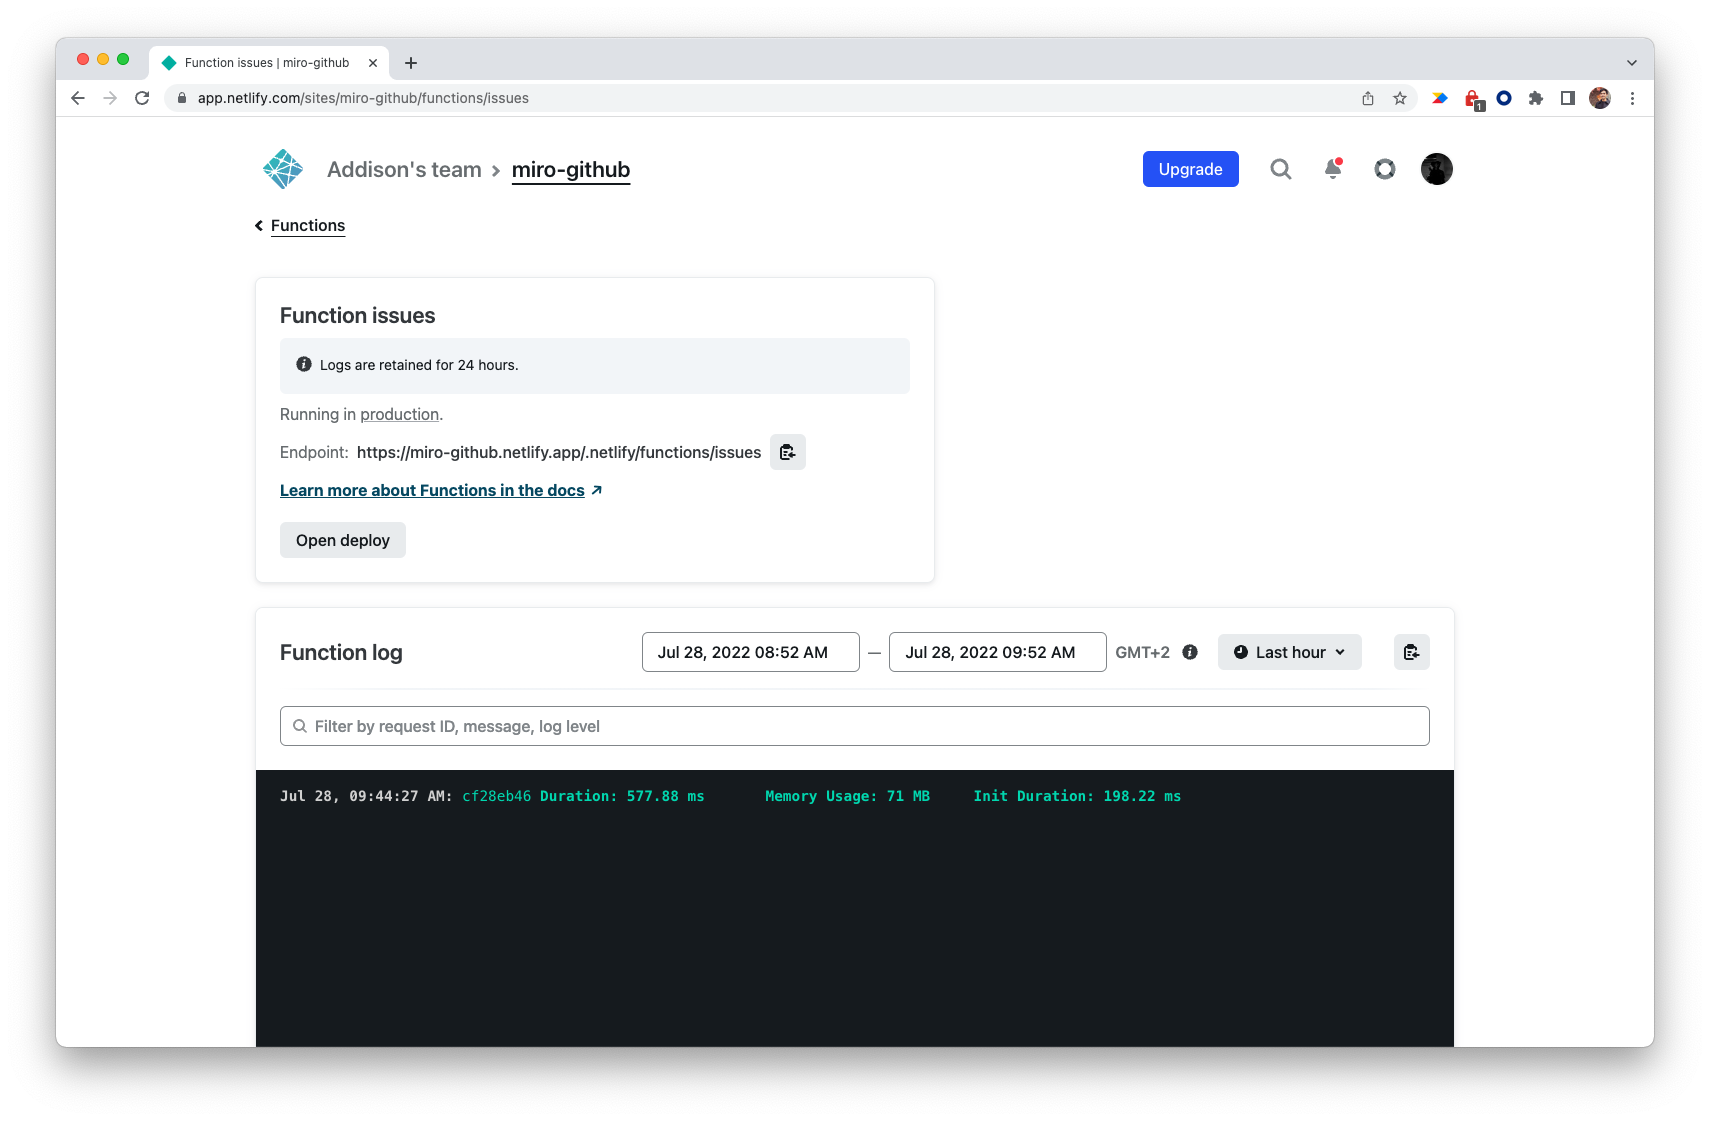
Figure 6. A Netlify function as displayed on the Netlify UI.
Netlify Functions are serverless functions that run when requests are sent to the related endpoint.
Main features and workflows
The guide helps you explore the main features of the app, with a focus on the relevant code for the features described, as well as typical workflows that the app enables.
- Authorization
- Workflow 1: import GitHub project cards to Miro
- Workflow 2: convert Miro sticky notes to GitHub project cards
- Workflow 3: update issues in GitHub
- Workflow 4: update app cards in Miro
Authorization
Before your app can perform any actions, it must be authorized. Let's start by diving into authorization of both the frontend application in Miro (Web SDK), and the use of Miro’s RESTful services (REST API, backend) via OAuth 2.0.
We have a separate dedicated guide for Enabling REST API Authentication from Miro's WEB SDK Authorization that outlines the entire process.
This guide and code sample uses a backend through Supabase to store user information and authentication tokens after they go through the authorization process.
This information is later used in the following workflows when sending requests through Miro's REST API.
Workflow 1: import GitHub project cards to Miro
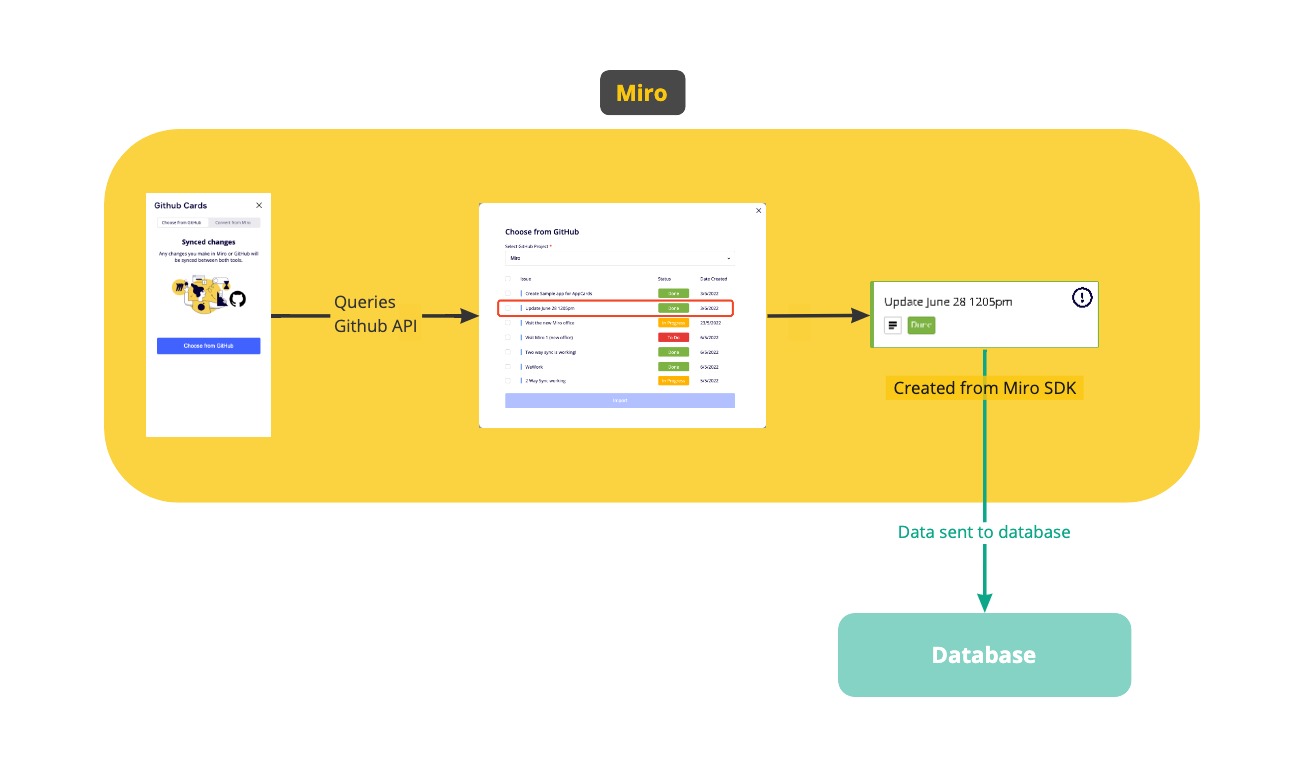
Figure 9. The diagram illustrates the flow where users import GitHub project cards to a Miro board and sync them there as app cards.
The goal of this workflow is to import a GitHub project card to Miro. It focuses on importing a GitHub issue that lives in a GitHub project to Miro as a Miro app card.
Before we dive in, you might want to review the glossary to brush up your knowledge of the items we’ll be covering.
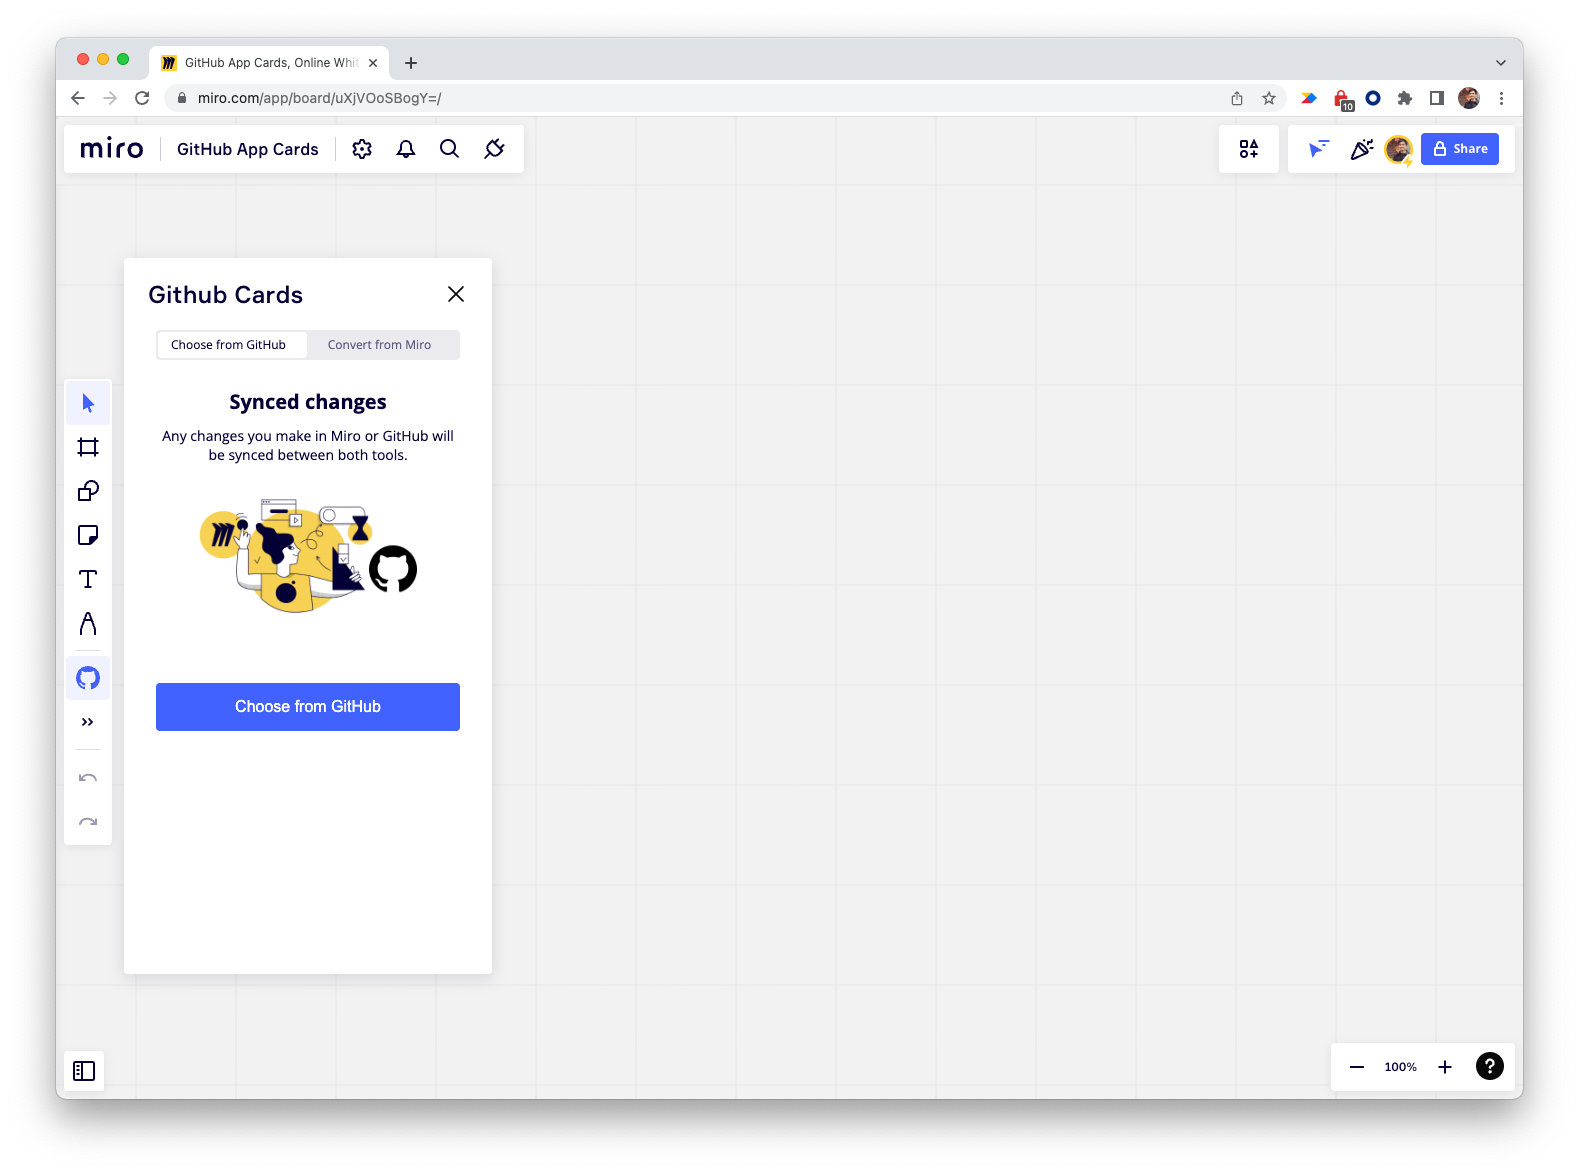
Figure 10. The app panel. The active tab on the panel enables importing GitHub cards to a Miro board as app cards.
The app UI leverages the Miro Web SDK. It features options to choose different GitHub project cards from a GitHub repository that the user can access.
The UI code is in these files:
src/app.tsxsrc/components/GitHub/GitHub.tsxsrc/appcard-modal.tsx
When users click Choose from GitHub on the app panel, the modal opens, and the app sends some API calls to GitHub to fetch information about the project cards that are currently in the repository.
The code with the API calls is in src/utils/github.ts.
The sequence of API calls follows this flow:
- First, the app sends a request to fetch all the project boards associated with our GitHub account and repository.
- Then, in the selected project board, the app sends a request to fetch the columns and the corresponding column headers.
- Finally, the app sends a request to get all the cards in all the columns that the previous call returned.
The app stores this information in the component’s state, so it can read and use this information to import selected GitHub cards.
All the project cards the API calls to GitHub return are rendered in a list view, with the option to select multiple cards to import.
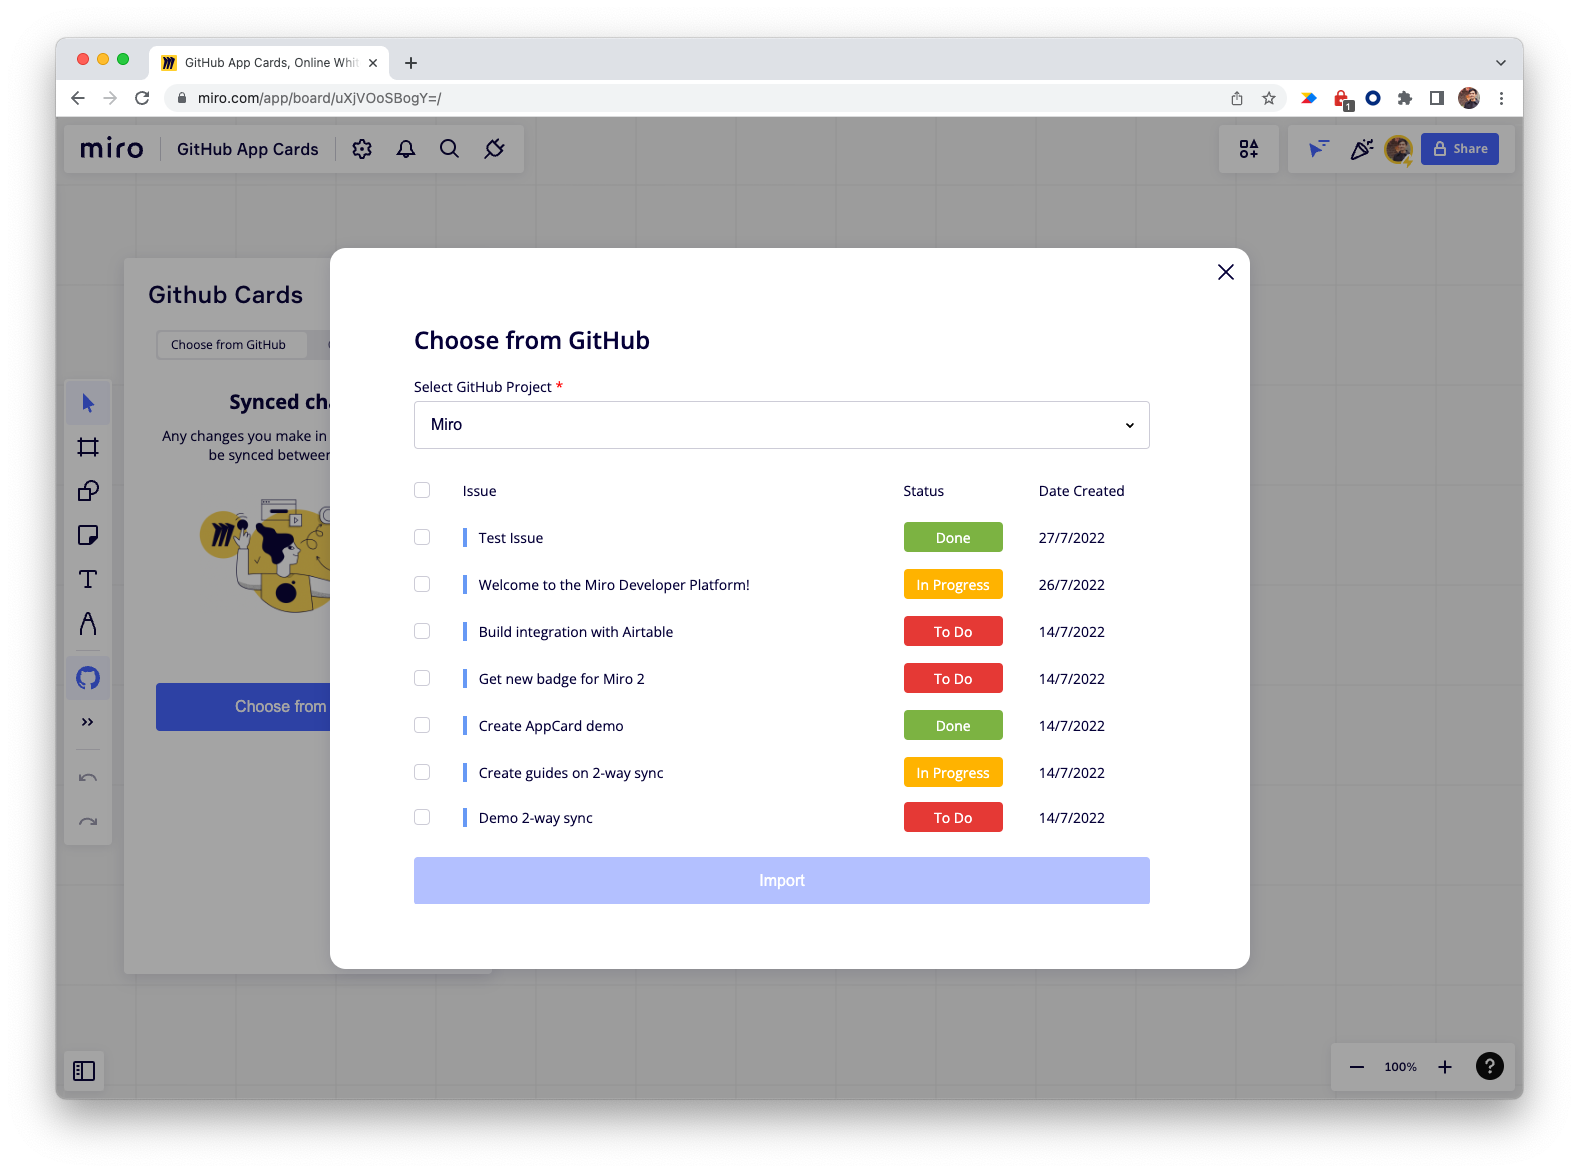
Figure 11. The app modal. The modal displays a list of available GitHub issues that users can select to import them to the board as app cards.
The current GitHub project board may not include all the issues logged in the GitHub repository. Therefore, your app needs to also make a call to the GitHub issues endpoint. From the returned results, it needs to filter out any project cards that don't belong to the current GitHub project.
When a user selects at least 1 issue, and then clicks Import, the app sends a request to Miro via the Web SDK to fetch the content, and to create an app card on the board for each selected issue.
After getting the information about the GitHub project card, the next step is creating an app card, and then mapping the fields between the GitHub issue and the app card. The resulting app card correctly represents the content of the associated GitHub issue.
The code with the full body of the insertion of the app cards is in utils/miro.ts.
The GitHub username and repository are hard-coded in
src/constants.ts.
Every time a user creates an app card from a GitHub issue, the corresponding mapping data is stored to the database, and it's linked to the other Auth table via the user’s miroUserId field.
For the full functionality of 2-way sync to work, it's necessary to store the mapping data to the database.
You also need to link the row to a user in the Auth table via a miroUserId, as that information contains the user's access token, which is required when making calls to the Miro’s REST API.
You can see this in action in workflows 3 and 4.
Workflow 2: convert Miro sticky notes to GitHub project cards
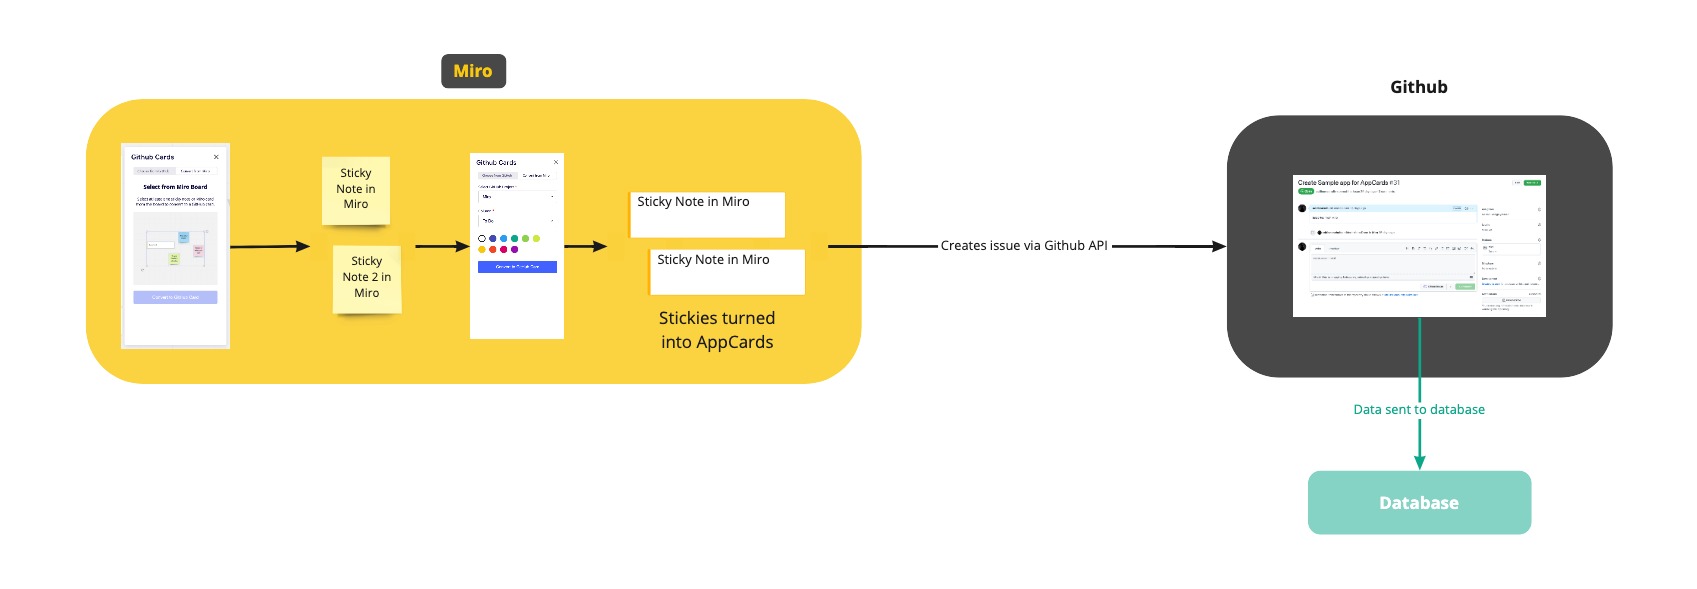
Figure 12. The diagram illustrates the flow where users create a sticky note on a Miro board and export it as a GitHub card to a GitHub project.
The goal of this workflow is to convert Miro sticky notes to GitHub project cards. It focuses on converting a selection of sticky notes on a Miro Board to Miro app cards, creating the corresponding GitHub issues, and attaching the issues as project cards to the GitHub project board.
Before we dive in, you might want to review the glossary to brush up your knowledge of the items we’ll be covering.
On the app panel, select Convert from Miro. If there's no current selection, a placeholder screen describes what to do to start the workflow.
No selection
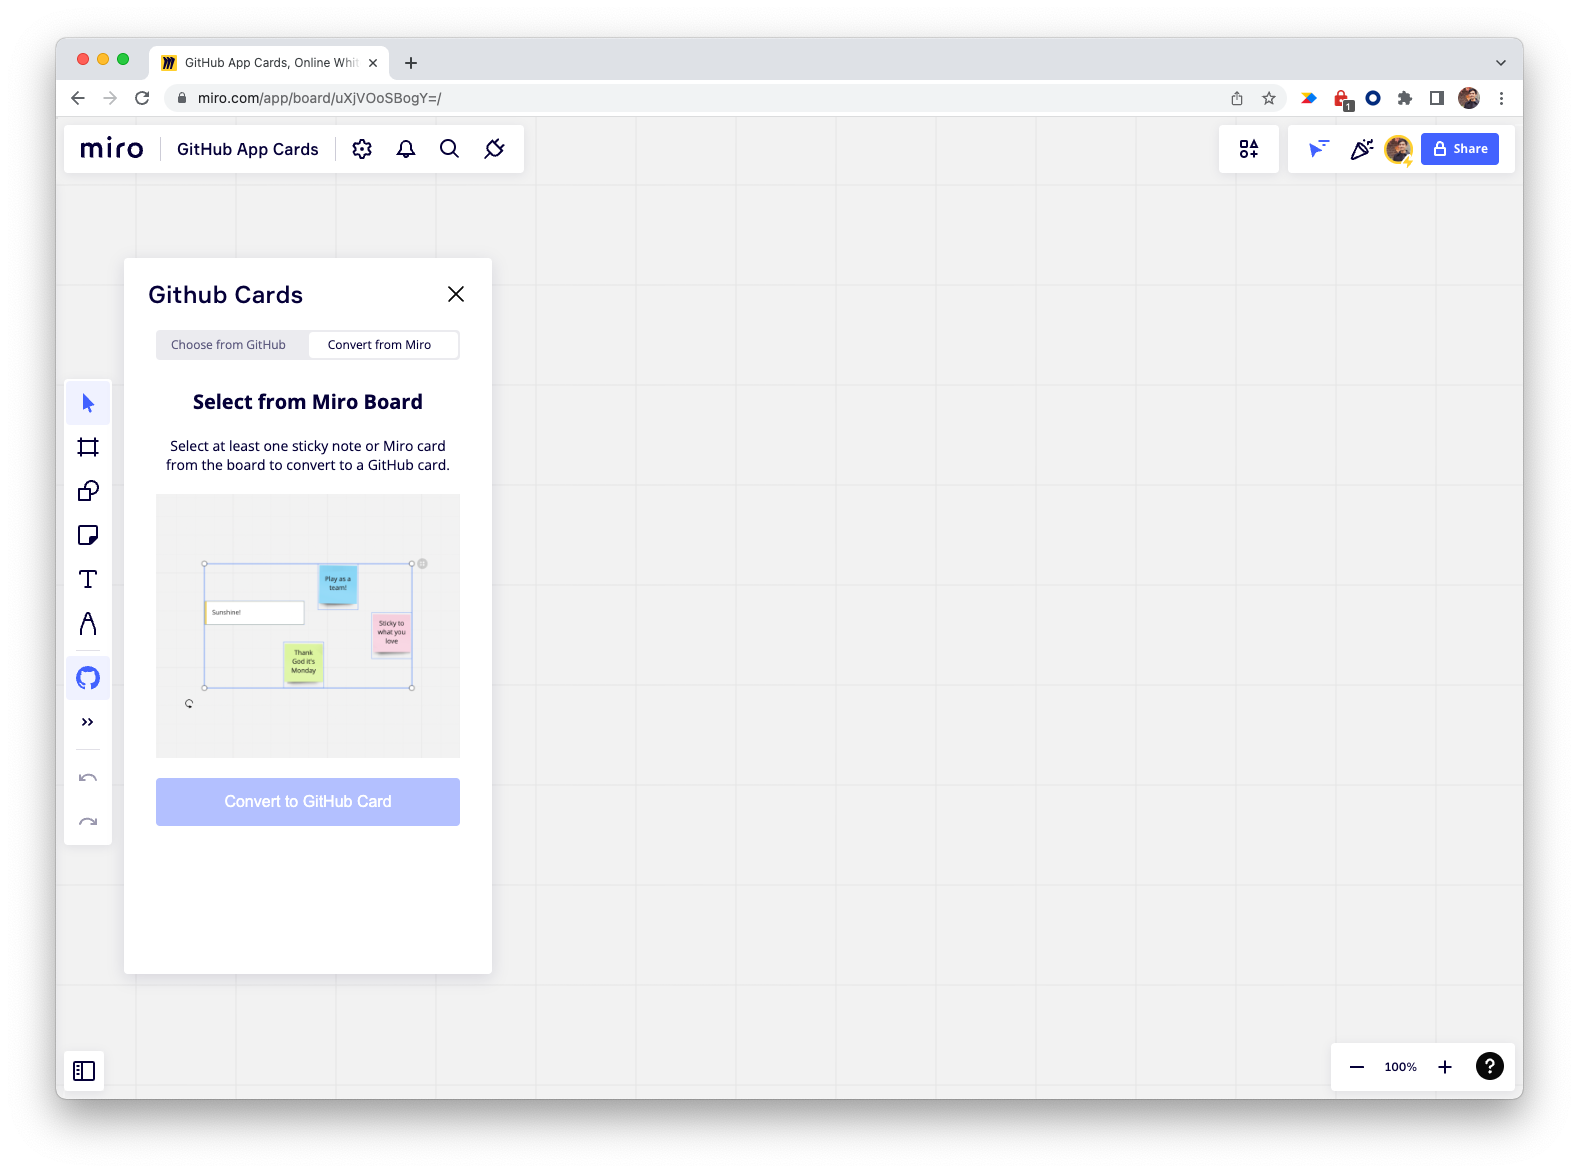
Figure 13. The app modal. The user hasn't selected any sticky notes on the board, yet.
Selection
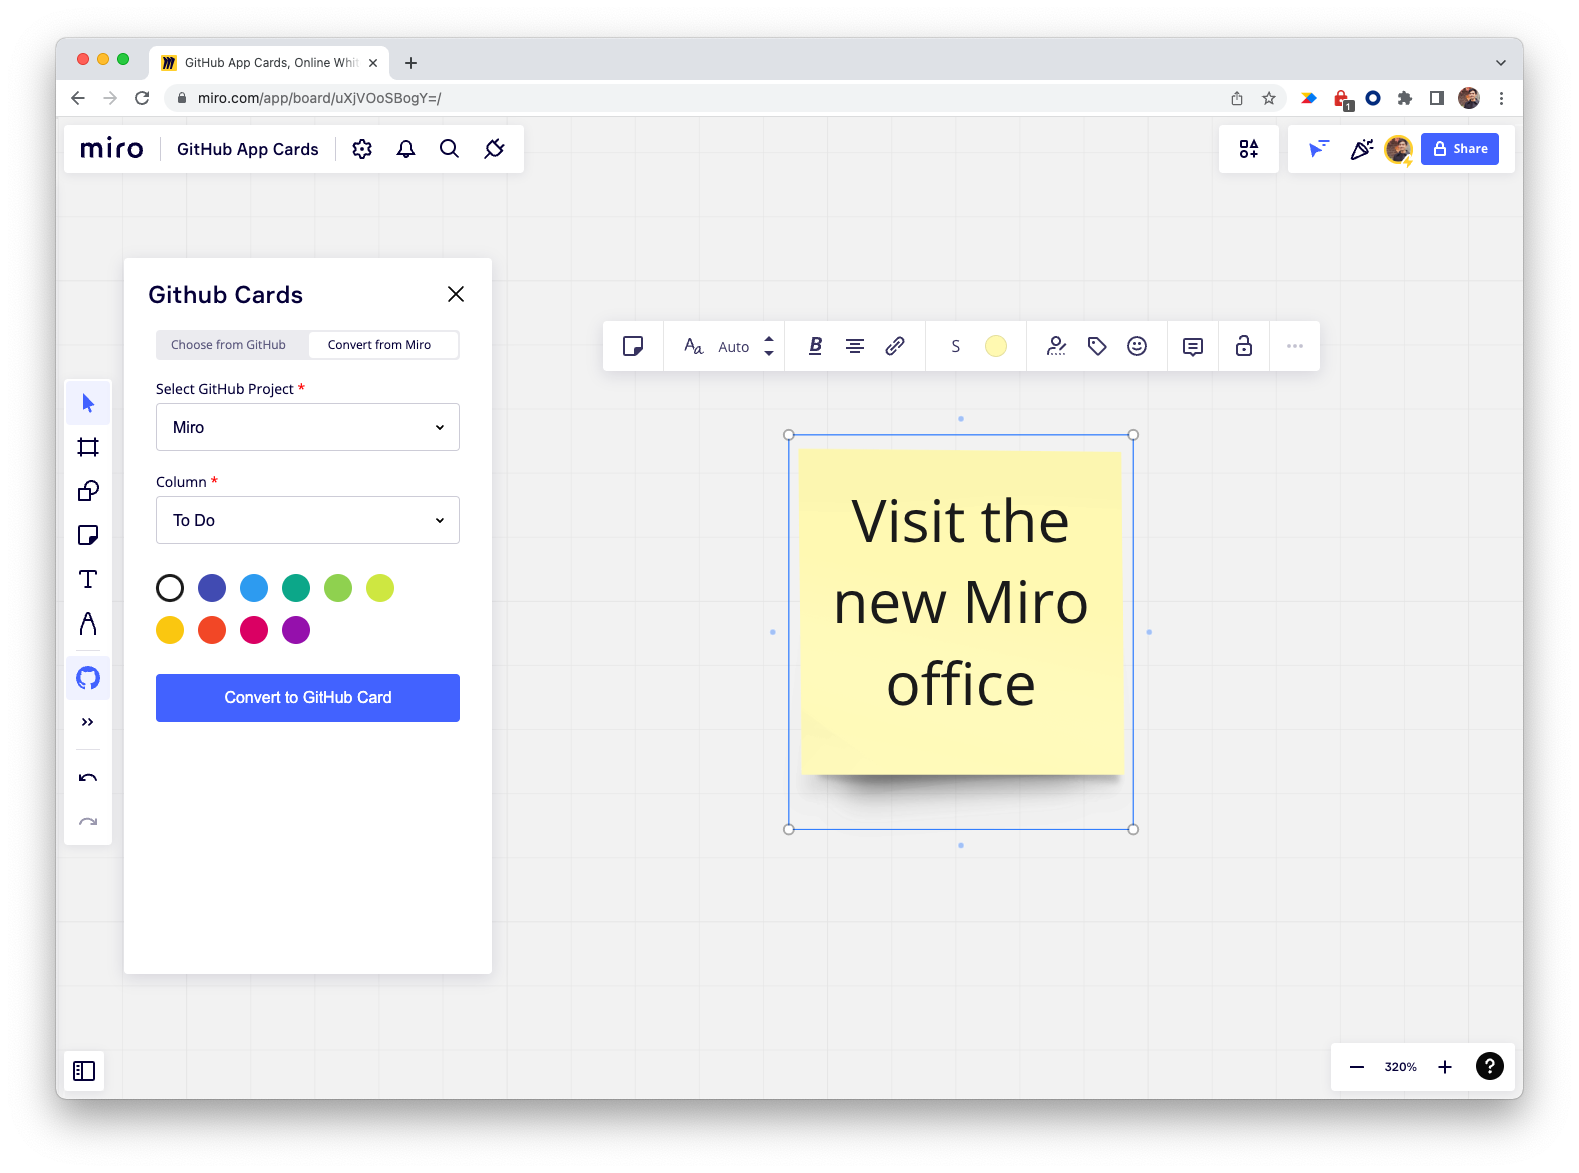
Figure 14. The app modal. The user has selected a sticky note on the board, and they can proceed to import it to the specified GitHub project.
The app UI leverages the Miro Web SDK. It features options to select a destination GitHub project, a column, and a color for the cards.
The UI code is in these files:
src/app.tsxsrc/components/Miro/Miro.tsxsrc/components/Miro/Selection.tsxsrc/components/Miro/NoSelection.tsx
When users click Choose from GitHub on the app panel, the modal opens, and the app sends some API calls to GitHub to fetch information about the project cards that are currently in the repository.
Users select at least a sticky note on the board, and then open the app panel.
On the Convert from Miro tab, they can set the following options for the GitHub card that they're about to create from the sticky note:
- The destination GitHub project.
- The GitHub project column to add the sticky note content to.
- A color to assign to the app card connected with the GitHub card, and resulting from the sticky note-to-GitHub card conversion process.
Clicking Convert to GitHub Card calls the handleCreateGitHubCards function.
handleCreateGitHubCards maps over the selected item(s) on the Miro board, and it performs a few actions on each selected item:
- First, it creates a GitHub issue for the item using the GitHub Issue API.
The title of the issue is the content of the sticky note. - Next, it calls the GitHub Project API to create a new project card.
The GitHub issue created in the previous step is attached as the content of the new project card. - Then, the
insertAppCardsfunction insrc/utils/miro.tsreplaces the selected sticky note on the board with an app card.
The new app card has the same position and content as the sticky note it replaces.
The sticky note-to-app card replacement is necessary to:- Connect the app card on the board to the corresponding GitHub project card.
- Add the card mapping data to the database to enable syncing and updating of the cards at a later time.
- Lastly, the
removeSelectedItemfunction insrc/utils/miro.tsremoves the original selected sticky note to leave on the board only the app card created in the previous step.
This workflow contains many moving parts.
The code and the methods are in:
src/components/Miro/Miro.tsxsrc/utils/miro.ts
- This example works only with selected sticky notes.
However, the workflow works with any Miro board items that feature a content field, namely:- The actions performed on the items–create a GitHub issue, create a GitHub project card, create an app card, remove the selected sticky note–are all called asynchronously.
You may want to set up custom error handling, based on how you'd like your app to handle errors.
Workflow 3: update issues and project cards in GitHub

Figure 15. The diagram illustrates the flow where users update a GitHub card, which updates the synced app card on a Miro board.
The goal of this workflow is to update an issue or a project card in GitHub. It focuses on updating content in GitHub, and then using GitHub actions to sync the corresponding app cards on a Miro board.
Before we dive in, you might want to review the glossary to brush up your knowledge of the items we’ll be covering.
This workflow starts from GitHub. It triggers when updating either an issue or a project card.
When an issue or a project card is updated, the corresponding GitHub Action is called.
GitHub Actions are YAML files; they live in .github/workflows.
To manage updates across more than just issues and project cards, see Events that trigger workflows on GitHub Docs.
Events get triggered with a data payload on the updated issue or project card.
The payload contains information such as issue or project card ID, the content that was updated, and so on.
Synced app cards on the Miro board contain data from both GitHub issues and GitHub project cards.
To manage these updates as separate workflows, it's necessary to set up two GitHub Actions, each with a dedicated endpoint.
A POST request to these endpoints sends the updated data to the Netlify Functions that handle the update.
The corresponding code is in:
netlify/functions/issues.jsnetlify/functions/project-cards.js
Endpoint: /issues
Example: <https://your-hosted-app/.netlify/functions/issues>
When a GitHub issue is updated, the endpoint and its corresponding GitHub Action propagate the changes to the title and description fields of the app card that is synced with the updated issue.
Endpoint: /project-cards
Example: <https://your-hosted-app/.netlify/functions/project-cards>
When updating a GitHub project card, the endpoint and its corresponding GitHub Action propagate the changes to the status field of the app card that is synced with the updated project card.
The app card status depends on the GitHub project board column containing the project card.
The two endpoints update different data, but they share the same flow. As a request with data comes in, the following actions take place:
- First, the content of the incoming body is parsed and read. It should contain information about the updated issue.
- Then, a call to the database fetches the card mapping data related to the ID of the updated issue.
Because a GitHub issue can be synced to multiple Miro app cards, the call may return multiple database entries. - Lastly, each returned entry initiates an API call to Miro’s update app card endpoint with the updated data.
The call updates the relevant app cards in the Miro boards they belong to.
This workflow features 2 separate actions and endpoints to manage data, as the information is stored in 2 separate (but similar) entities: GitHub issues and GitHub project cards.
To manage your data, you may need only 1 workflow instead.
Workflow 4: update app cards in Miro
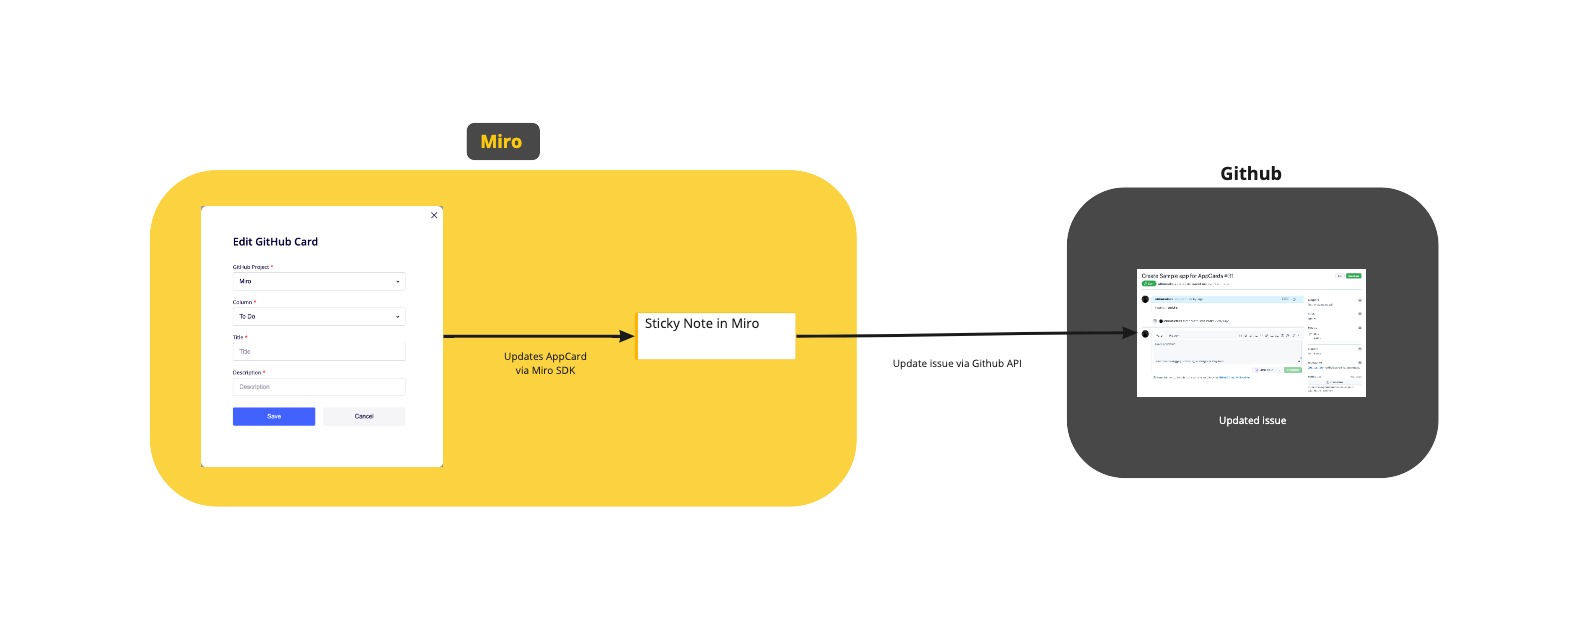
Figure 15. The diagram illustrates the flow where users update an app card on a Miro board, which updates the synced GitHub card in the corresponding GitHub project.
The goal of the last workflow is to update an app card on a Miro board. It focuses on updating content in Miro, and then propagating the changes to the corresponding GitHub issues and project cards in GitHub.
Before we dive in, you might want to review the glossary to brush up your knowledge of the items we’ll be covering.
App cards on Miro boards can display a fully customizable UI inside a modal. App cards in these examples only use a few fields relevant to GitHub (Project Column, Title, and Description); therefore the custom UI is designed to accommodate only these fields.
The UI code for the app card modal is in src/appcard-modal.tsx.
As the user populates the app card fields with their input, the app card modal stores the data.
When the user clicks Save, two separate methods are called to update the fields in GitHub:
- First, a query to the database fetches a list of all the linked project cards and Miro app cards existing across the user's Miro boards.
- Then, mapping over the returned items allows using this information to update GitHub with the new data.
These methods are insrc/appcard-modal.tsx. - Project and Column data is sent to the
updateGitHubProjectCardmethod, whereas Title and Description data is sent to theupdateGitHubIssuemethod.
These methods are insrc/utils/github.ts. - Next, it's also necessary to update the app card modal with the new data.
- Lastly, a Miro Web SDK call gets the current app card being edited to update and sync the values manually upon saving the changes.
This process enables updating everything:- The changed content in GitHub, which triggers the subsequent updates across other Miro boards and matching app cards.
- The currently open app card on the Miro board.
Edge cases
2-way sync is complex, so certain flows and edge cases were addressed in an opinionated way. You may want to think about the way your app does things, such as:
- Handling errors.
- Handling and storing user authentication.
Additional considerations
This guide walks through the main components of the 2-way sync workflow that we’ve implemented in our GitHub Cards <> Miro sample app.
Of course, there are alternative ways to organize and implement 2-way sync.
For example, you might:
- Consider replacing serverless functions with a traditional backend server setup to listen for events related to the third party you’re implementing 2-way sync with.
- Choose to integrate with a third party that doesn’t offer webhooks, requiring you to long poll their API, work with WebSockets, and so on.
- Implement expiring tokens (strongly recommended as a security best practice).
- Choose to leverage a more traditional database, such as PostgreSQL.
Let's wrap up
You can use the Miro Developer Platform to make complex apps and integrations. If you have an idea in mind, the sky's the limit.
Go to our GitHub repo to explore many more examples of other apps built using the Miro Developer Platform.
Make sure to join our Developer Community to learn more about the Miro Developer Platform and chat with other Miro developers.
See also
- Complete sample app to enable 2-way sync between Miro app cards and GitHub cards
- Miro Web SDK reference documentation on the app card item
- Miro App Examples on GitHub
Updated about 2 years ago
To discover and to get acquainted with more Web SDK features, check the other tutorials.