Board UI
Methods
canOpenPanel(...)
() => Promise<boolean>
Checks if there are blocking elements before attempting to open a panel in the UI.
Panels that are already open from other sources can block these requests. It's recommended to check using miro.board.ui.canOpenPanel before using miro.board.ui.openPanel.
Example:
if (await miro.board.ui.canOpenPanel()) {
  await miro.board.ui.openPanel({
    url: 'show-this-page-in-the-panel.html',
    height: 400,
  });
}
openPanel(...)
(
  options: Identity<{ height?: number; title="url">url: string } & conditional>
) => Promise<{ waitForClose: () => Promise<Result | undefined> }>
Opens a panel on the current board.
The content displayed in the panel is fetched from the specified URL.
- The panel height corresponds to the current viewport height.
- Panel width: currently it's set to
368dp, fixed, padding included.
You should implement your app to adapt to content area width changes between292dp and320dp, and to accommodate a fixed panel width between340dp and368dp, padding included. - Left padding:
24dp - Right padding:
24dp
When opening a panel, you can pass in data that can be accessed within the panel itself. Use the data property within the options object to pass the necessary information.
Note: To get the data from inside the panel, use
getPanelData()method.
The method for opening the panel returns a Promise. This Promise resolves to an object that includes a waitForClose() method:
Promise<{ waitForClose: () => Promise<Result | undefined> }>;The waitForClose() method returns a Promise that resolves to the result of the panel when it's closed, or undefined if there is no result.
The result is a value that is passed as a parameter into closePanel() method.
Note: When a user manually closes a panel, the promise returned by the
waitForClose()method always resolves with anundefinedvalue.
Example:
// Example 1: Basic usage of openPanel
await miro.board.ui.openPanel({
  url: 'show-this-page-in-the-panel.html',
});
// The panel is displayed on the board

// Example 2: Passing data into the panel
const dataForModal = "hello world";
await miro.board.ui.openPanel<string>({
  data: dataForModal,
  url: 'show-this-page-in-the-panel.html',
});

// Example 3: Waiting for the panel to close
const someData = { message: "my message" };
const { waitForClose } = await miro.board.ui.openPanel<{message: string}, string>({
  data: someData,
  url: 'show-this-page-in-the-panel.html',
});

// Inside the panel, you can call the following to close the panel and resolve the Promise:
//     await miro.board.ui.closePanel('result');
console.log(await waitForClose()); // This will log: "result"
The content that apps display on modals and panels opens inside iframes.
iframes can request access to the following permissions:
microphone:listen: access a user's microphone to record audio in an iframe.screen:record: access a user's screen to record it in an iframe.webcam:record: access a user's camera to record video.
See also:
| Name | Type | Description |
|---|---|---|
options | object | - |
options.url | string | Absolute or relative URL pointing to the content that you want to display in the panel. If you specify a relative URL, the URL path resolves relative to the app URL. The transport protocol must be HTTPS. |
options.data? | any | Any data that you want to pass directly to the panel and use it inside the panel itself. Check the getPanelData() method. |
getPanelData(...)
() => Promise<undefined | Data>
Retrieves the data associated with the currently open panel in the Miro board. This data is initially passed to the panel when it is opened using the miro.board.ui.openPanel({ data, ... }) method.
This method is typically called from within the panel itself to access any data that it needs to function correctly. If no data was passed when the panel was opened, calling getPanelData will return a promise that resolves to undefined.
Note:
getPanelDatawill always return promise that resolves or toundefinedor to the actual passed data.
Example:
Consider the following scenario where a panel is opened with some data:
// Define some data to pass to the panel
const someData = { message: "my message" };

// Open a panel and pass the data to it
const { waitForClose } = await miro.board.ui.openPanel<{message: string}, string>({
  data: someData,
  url: 'show-this-page-in-the-panel.html',
  height: 400,
});
Now, from within the panel, you can retrieve this data using getPanelData():
// Retrieve the data from within the panel
const data = await miro.board.ui.getPanelData<{message: string}>()

console.log(data) // Outputs: "{ message: "my message" }"
closePanel(...)
(result?: Result) => Promise<void>
Closes an open panel on the current board.
This method accepts an optional result parameter. Providing this parameter results in the panel being resolved with the provided value. If you use the waitForClose() method—returned by the miro.board.ui.openPanel(...)—the promise returned by waitForClose() will resolve, returning the value of result.
TLDR; If you've passed a result value and close the panel, this value will be returned by the waitForClose() promise. This is useful if you want to perform some action based on the result after the panel is closed.
ℹ️ Note:
- To close an open panel,
closePanelmust be executed afteropenPanel. - The app that closes the panel with
closePanelmust be the same that opened it withopenPanel.
Example:
// Open a panel
await miro.board.ui.openPanel({
  url: 'show-this-page-in-the-panel.html',
  height: 400,
});

// Close the open panel
await miro.board.ui.closePanel();

// Open a panel and wait for the result
const {waitForClose} = await miro.board.ui.openPanel({
  url: 'show-this-page-in-the-panel.html',
  height: 400,
});

async function logResult() {
    const result = await waitForClose();
    console.log(result) // This will log: "Hello world!"
}

logResult()

// Close the open panel with some result
await miro.board.ui.closePanel("Hello world!");
The content that apps display on modals and panels opens inside iframes.
iframes can request access to the following permissions:
microphone:listen: access a user's microphone to record audio in an iframe.screen:record: access a user's screen to record it in an iframe.webcam:record: access a user's camera to record video.
See also:
canOpenModal(...)
() => Promise<boolean>
Checks if there are blocking elements before attempting to open a model in the UI.
Modals are blocking elements, meaning there can be only one modal displayed at a time for a user. If your operation happens at the same time as another Miro modal is being shown, your modal won't be displayed to the user. It's recommended to check using miro.board.ui.canOpenModal before using miro.board.ui.openModal.
Example:
if (await miro.board.ui.canOpenModal()) {
  await miro.board.ui.openModal({
    url: 'show-this-page-in-the-modal.html',
    width: 600,
    height: 400,
    fullscreen: false,
  });
}
openModal(...)
(
  options: Identity<{ fullscreen?: boolean; height?: number; title="url">url: string; width?: number } & conditional>
) => Promise<{ waitForClose: () => Promise<Result | undefined> }>
Opens a modal on the current board.
The content displayed in the modal is fetched from the specified URL.
The max. width and height of the modal correspond to the width and height of the current viewport.
The load timeout for the modal is 10 seconds.
You have the ability to pass data into a modal that you open. This data can then be accessed from within the modal itself. To pass data, use the data property in the options object when opening it.
Note: to get the data from inside the modal you have to use
getModalData()method.
The method for opening the modal returns a Promise. This Promise resolves to an object that includes a waitForClose() method:
Promise<{ waitForClose: () => Promise<Result | undefined> }>;The waitForClose() method returns a Promise that resolves to the result of the modal when it's closed, or undefined if there is no result.
The result is a value that is passed as a parameter into closeModal() method.
Note: promise returned by
waitForClose()method will always be resolved withundefinedvalue in case of manual closing of modal by user.
Example:
// Example 1: Basic usage of openModal
await miro.board.ui.openModal({
  url: "show-this-page-in-the-modal.html",
  width: 600,
  height: 400,
  fullscreen: false,
});
// This will open a modal with the specified URL, width, and height. The modal will not be displayed in fullscreen mode.

// Example 2: Passing data into the modal
const dataForModal = "hello world";
await miro.board.ui.openModal<string>({
  data: dataForModal,
  url: "show-this-page-in-the-modal.html",
  width: 600,
  height: 400,
  fullscreen: false,
});

// Example 3: Waiting for the modal to close
const someData = { message: "my message" };
const { waitForClose } = await miro.board.ui.openModal<{message: string}, string>({
  data: someData,
  url: "show-this-page-in-the-modal.html",
  width: 600,
  height: 400,
  fullscreen: false,
});

// Inside the modal, you can call the following to close the modal and resolve the Promise:
//     await miro.board.ui.closeModal('result');
console.log(await waitForClose()); // This will log: "result"| Name | Type | Description |
|---|---|---|
options | object | - |
options.url | string | Absolute or relative URL pointing to the content that you want to display in the panel. If you specify a relative URL, the URL path resolves relative to the app URL. The transport protocol must be HTTPS. |
options.height? | number | Sets the height of the modal, in dp. The max. height of the modal corresponds to the height of the current viewport. Default: 600 |
options.width? | number | Sets the width of the modal, in dp. The max. width of the modal corresponds to the width of the current viewport. Default: 800 |
options.fullScreen? | boolean | Set it to:
false |
options.data? | any | Any data that you want to pass directly to the modal and use it inside the modal itself. Check the getModalData() method. |
getModalData(...)
() => Promise<undefined | Data>
Retrieves the data associated with the currently open modal in the Miro board. This data is initially passed to the modal when it is opened using the miro.board.ui.openModal({ data, ... }) method.
This method is typically called from within the modal itself to access any data that it needs to function correctly. If no data was passed when the modal was opened, calling getModalData will return a promise that resolves to undefined.
Note:
getModalDatawill always return promise that resolves or toundefinedor to the actual passed data.
Example:
Consider the following scenario where a modal is opened with some data:
// Define some data to pass to the modal
const someData = { message: "my message" };

// Open a modal and pass the data to it
const { waitForClose } = await miro.board.ui.openModal<{message: string}, string>({
  data: someData,
  url: "show-this-page-in-the-modal.html",
  width: 600,
  height: 400,
  fullscreen: false,
});
Now, from within the modal, you can retrieve this data using getModalData():
// Retrieve the data from within the modal
const data = await miro.board.ui.getModalData<{message: string}>()

console.log(data) // Outputs: "{ message: "my message" }"
closeModal(...)
(result?: Result) => Promise<void>
Closes an open modal on the current board.
This method accepts an optional result parameter. Providing this parameter results in the modal being resolved with the provided value. If you use the waitForClose() method—returned by miro.board.ui.openModal(...)—the promise returned by waitForClose() will resolve, returning the value of result.
TLDR; If you've passed a result value and close the modal, this value will be returned by the waitForClose() promise. This is useful if you want to perform some action based on the result after the modal is closed.
ℹ️ Note:
- To close an open modal,
closeModalmust be executed afteropenModal. - The app that closes the modal with
closeModalmust be the same app that opened it withopenModal.
Example:
// Open a modal
await miro.board.ui.openModal({
  url: 'show-this-page-in-the-modal.html',
  height: 400,
  width: 600,
  fullscreen: false,
});

// Close the open modal
await miro.board.ui.closeModal();

// Open a modal and wait for the result
const {waitForClose} = await miro.board.ui.openModal({
  url: 'show-this-page-in-the-modal.html',
  height: 400,
  width: 600,
  fullscreen: false,
});

async function logResult() {
    const result = await waitForClose();
    console.log(result) // This will log: "Hello world!"
}

logResult()

// Close the open modal with some result
await miro.board.ui.closeModal("Hello world!");
on(...)
(event: 'drop', handler: (event: DropEvent) => void) => void
on property
on propertymiro.board.ui.on(event, handler);If you want your app to react to an event by executing a function, you can use the on property to subscribe to events.
The on property subscribes the app to listen to an event. When the event fires, the event handler executes a function to perform an action.
To subscribe to an event and its handler, pass to the on property:
- The event that your app should listen to.
- The event handler that the app needs to call when the event fires.
💡 To unsubscribe from an event and its handler, use the off property.
Supported events
| Event type | Event handler | Event fires when... | |
|---|---|---|---|
drop | (event: DropEvent) | An HTML element is dropped from an open panel to the board. See also Add drag and drop to your app. | |
icon:click | () | An app icon is clicked. See also Add clicking on an icon to your app. | |
app_card:open | (event: AppCardOpenEvent) | The app card status icon is connected, the icon is clicked, and it enables opening a modal with the app card detail view. | |
app_card:connect | (event: AppCardConnectEvent) | The app card status icon is disconnected, the icon is clicked, and it enables connecting an app card with a corresponding data source. | |
selection:update | (event: SelectionUpdateEvent) | An area on the board is selected. | |
online_users:update | (event: OnlineUsersUpdateEvent) | The number of currently online board users changes. | |
items:create | (event: ItemsCreateEvent) | New items are created on the board. | |
experimental:items:update | (event: ItemsUpdateEvent) | Existing items are updated on the board. | |
items:delete | (event: ItemsDeleteEvent) | Existing items are deleted from the board. | |
custom:${string} | (event: CustomEvent) | A custom action on a board item is initiated. |
Dispatching events
In general, when an app subscribes to an event, the event is dispatched to all iframes:
This behavior makes it easy to subscribe to an event from any of these iframes, without worrying about which iframe the event is dispatched to.
ℹ️ Note:
icon:clickis dispatched only to the headless/main iframe.
Typically,icon:clickis used to open a panel or a modal when a user clicks the app icon on the app toolbar or the app toolbar panel.
drop event
drop eventon(event: 'drop', handler: (event: DropEvent) => void): voidWhen an app subscribes to this event, it's dispatched to all iframes.
drop registers the event associated with dropping one or more selected items on the board.
The event handler has the following properties:
| Property | Type | Description |
|---|---|---|
x | Number | Coordinate that defines the horizontal position of the HTML element to drop on the board. |
y | Number | Coordinate that defines the vertical position of the HTML element to drop on the board. |
target | Element interface | The HTML element that is the recipient of the drop event. |
Example:
/** When the selected HTML element is dropped on the board:
 *  1. A sticky note is created.
 *  2. The text of the HTML element is assigned to the
 *     'content' property of sticky note.
 */
miro.board.ui.on('drop', async ({x, y, target}) => {
  await miro.board.createStickyNote({
    x,
    y,
    content: target.innerText,
  });
});
You can provide a custom preview image for drag & drop using data attributes on elements with class="miro-draggable":
data-drag-preview- Specify the URL of the preview image to use during dragging.data-drag-preview-width- (Optional) Set thewidthof the preview image in pixels.data-drag-preview-height- (Optional) Set theheightof the preview image in pixels.
Preview image size behavior:
- If no
widthorheightis set, the original image size will be used. - If only
widthorheightis set, that dimension will be used and the other dimension will be calculated to maintain aspect ratio. - If both
widthandheightare set, those dimensions will be applied and aspect ratio will be ignored.
A valid URL pointing to or representing the image. Possible formats:
- A publicly available, absolute URL to an image.
- A base64-encoded data URL:
data:image/<image-file-format>;base64,<base64-encoded-image>.
Example:
<!DOCTYPE html>
<html lang="en">
  <head>
    <meta charset="UTF-8" />
    <title>My panel with draggable items</title>
    <!-- Loads the Miro Web SDK -->
    <script src="https://miro.com/app/static/sdk/v2/miro.js"></script>
    <!-- Loads the companion JS file with the logic -->
    <script src="app.js"></script>
  </head>
  <body>
    <!-- The 'miro-draggable' class makes HTML items draggable -->

    <!-- The `data-drag-preview` attribute changes preview image during dragging of element -->
    <div class="miro-draggable" data-drag-preview="https://amazing-images.com/categories/cats/cute-fluffy-kitten.png">
      Kitten
    </div>

    <!-- The `data-drag-preview-width` attribute changes preview image width. The `data-drag-preview-height` will work in the same way -->
    <div
      class="miro-draggable"
      data-drag-preview-width="100"
      data-drag-preview="https://amazing-images.com/categories/dogs/beautiful-dog.jpg"
    >
      Dog
    </div>

    <!-- The `data-drag-preview-width` + `data-drag-preview-height` force apply size and ignore aspect ratios of image -->
    <div
      class="miro-draggable"
      data-drag-preview-width="100"
      data-drag-preview-height="100"
      data-drag-preview="https://amazing-images.com/categories/dragons/scary-dragon.svg"
    >
      Dragon
    </div>
  </body>
</html>
icon:click event
icon:click eventon(event: 'icon:click', handler: () => void) => voidWhen an app subscribes to this event, it's dispatched only to the headless/main iframe.
icon:click registers click events on icons.
When a user clicks an icon, the registered event handler for icon:click is called.
Typically, icon:click is used to open a panel, or to display a modal.
Example:
/** When a user clicks the icon:
 *  1. The openPanel method is called
 *  2. The method opens the HTML page: `panel.html`
 */
miro.board.ui.on('icon:click', async () => {
  await miro.board.ui.openPanel({
    url: 'panel.html',
  });
});
app_card:open event
app_card:open eventon(event: 'app_card:open', handler: (event: AppCardOpenEvent) => void): void;When an app subscribes to this event, it's dispatched to all iframes.
app_card:open registers click events to open an app card from compact to detail view.
When a user clicks the icon to expand an app card to view it in detail, the registered event handler for app_card:open is called.
Typically, app_card:open is used to open a modal displaying the custom fields of the app card and their content.
Example:
/** When a user clicks the icon that expands an app card to view it in detail:
 *  1. The 'openModal' method is called
 *  2. The method opens a modal to display the specific app card content fetched from the URL
 */
// Listen to the 'app_card:open' event
miro.board.ui.on('app_card:open', (event) => {
  console.log('Subscribed to app card open event', event);
  const {appCard} = event;

  // Build a URL containing the app card ID.
  // You pass this URL with the 'openModal()' method below.
  // The code in the modal uses the 'appCardId' URL query parameter
  // to identify which app card was opened.
  const url = `https://my.app.example.com/modal.html?appCardId=${appCard.id}`;

  // Open the modal to display the content of the fetched app card
  miro.board.ui.openModal({
    url,
  });
});
app_card:connect event
app_card:connect eventon(event: 'app_card:connect', handler: (event: AppCardConnectEvent) => void): void;When an app subscribes to this event, it's dispatched to all iframes.
By default, newly created app cards have a disconnected status, unless the app card constructor sets a different value.
To connect an app card to a corresponding data source in an external application, an app must listen to the app_card:connect event.
When an app listens to the app_card:connect event:
- The
disconnectedicon is clickable.
 - On hovering over the icon, a tooltip is displayed to notify users that they can click the icon to connect the app card to a data source.
- When users click the icon, the
app_card:connectevent fires. - The event handler needs to include at least the logic to:
- Retrieve the data source that the app card maps to.
- Sync data to populate the app card fields with any updated information.
- Update the app card status from
disconnectedtoconnected. sync()the app card to propagate the changes to the board.
If the app listens also to the app_card:open event, it can react to it; typically, by opening a modal to display the app card detail view.
Example:
/** In a typical flow:
 *  1. The app creates an app card.
 *     The 'disconnected' status icon is not clickable, yet.
 *  2. The app listens to the 'app_card:connect' event.
 *     The 'disconnected' status icon is clickable.
 *  3. The app listens to the 'app_card:open' event.
 *  4. When users click the 'disconnected' status icon, a tooltip prompts them to connect the app card to its data source.
 *  5. When the app card is connected, its status icon changes to 'connected'.
 *  6. Now the app can open a modal to display the app card detail view.
 */

// Create an app card
const appCard = await miro.board.createAppCard({
  title: 'This is the title of the app card',
  // Default status of new app cards
  status: 'disconnected',
});

// Listen to the 'app_card:connect' event
miro.board.ui.on('app_card:connect', (event) => {
  console.log('Connect the app card to its data source');
  const appcard = event.appCard;
  // Update the app card status to 'connected'
  appcard.status = 'connected';
  // Propagate the app card updates to the board
  appcard.sync();
});

// Listen to the 'app_card:open' event
miro.board.ui.on('app_card:open', (event) => {
  console.log('Subscribed to app card open event', event);
  // URL containing the app card ID.
  // The content is displayed inside the modal
  const url = `https://my.app.example.com/modal.html?appCardId=${appCard.id}`;
  // Open the modal to display the content of the fetched app card
  miro.board.ui.openModal({
    url,
  });
});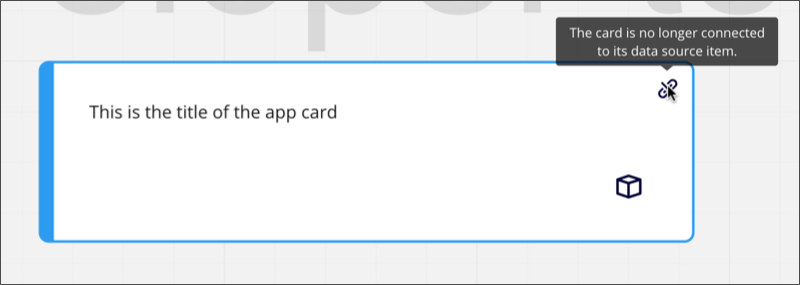
Figure 1. Newly created card, or duplicate app card through manual copying and pasting on the board UI. The app card status is disconnected. The tooltip notifies about the missing connection. The status icon isn't clickable.
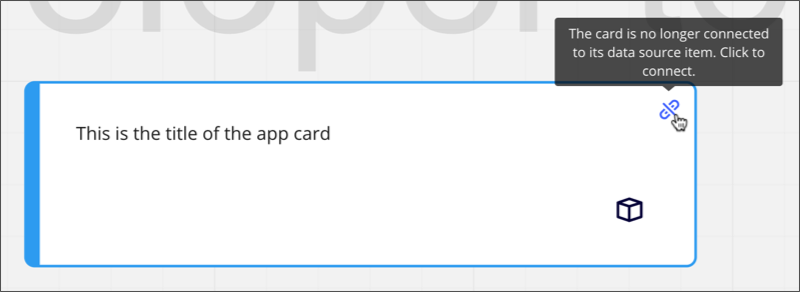
Figure 2. The app card status is disconnected. The tooltip prompts to connect it to its data source. The status icon is clickable.
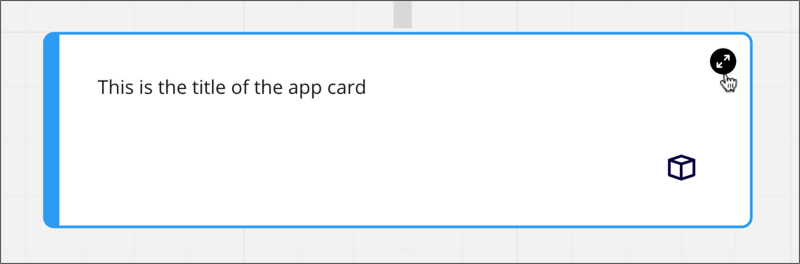
Figure 3. The app card status is connected. The app listens to the app_card:open event. When the icon is clicked, the event fires. Typically, it opens a modal to display the app card detail view.
selection:update event
selection:update eventon(event: 'selection:update', handler: (event: SelectionUpdateEvent) => void): void;When an app subscribes to this event, it's dispatched to all iframes.
selection:update registers the event associated with updating the content of the current selection on the board.
When a user selects an area on the board, the registered event handler for selection:update is called.
The event contains an array with the selected board items.
If the selected area doesn't include any board items, the array is empty.
If the grouped items are selected, the group entity for those items will also be returned.
When individual items within a group are selected with a double-click, the group entity will not be returned as part of this method.
You can add logic to perform actions on the selection, such as filtering specific item types, and then modifying them.
Example:
/** When a user clicks and selects multiple board items on a board:
 *  1. The 'selection:update' method logs the selection to the developer console
 *  2. A filter identifies sticky note items in the selection
 *  3. The color of the sticky notes is changed to 'cyan'
 */

// Listen to the 'selection:update' event
miro.board.ui.on('selection:update', async (event) => {
  console.log('Subscribed to selection update event', event);
  console.log(event.items);
  const selectedItems = event.items;

  // Filter sticky notes from the selected items
  const stickyNotes = selectedItems.filter((item) => item.type === 'sticky_note');

  // Change the fill color of the sticky notes
  for (const stickyNote of stickyNotes) {
    stickyNote.style.fillColor = 'cyan';
    await stickyNote.sync();
  }
});
online_users:update event
online_users:update eventon(event: 'online_users:update', handler: (event: OnlineUsersUpdateEvent) => void): voidWhen an app subscribes to this event, it's dispatched to all iframes.
online_users:update registers the event associated with a change in the number of users that are currently online on the board.
When a user joins or leaves the board, the registered event handler for online_users:update is called.
The event contains an array with user IDs and names of the online users.
Your app can include logic to perform follow-up actions based on the change in online users.
For example, it can greet a new user that just joined the board.
Example:
/** When the number of online users changes, identify the
 *  new online users and greet them with a notification.
 */

let currentOnlineUsers = [];
// Listen to the 'online_users:update' event.
await miro.board.ui.on('online_users:update', async (event) => {
  console.log('Subscribed to the update of online users');
  console.log('Online users: ', event.users);
  const onlineUsers = event.users;

  // Identify the new online users.
  const newUsers = onlineUsers.filter((user) => !currentOnlineUsers.find((u) => u.id === user.id));
  console.log('New users:', newUsers);

  // Greet the new online users.
  for (const newUser of newUsers) {
    await miro.board.notifications.showInfo(`Hello, ${newUser.name}!`);
  }

  currentOnlineUsers = onlineUsers;
});
items:create event
items:create eventon(event: 'items:create', handler: (event: ItemsCreateEvent) => void): void;When an app subscribes to this event, it's dispatched to all iframes.
items:create registers the event associated with the creation of a new item on the board.
When a user creates a new item on a board, the registered event handler for items:create is called.
The event contains an array with the created board items.
Your app can include logic to perform follow-up actions on the created items. For example, it can filter specific item types, and then process them by fetching or setting their properties.
ℹ️ Note:
- When creating a new item by copy-pasting or by duplicating an existing one,
items:createisn't triggered.
Example:
/** When a user creates a new item on a board:
 *  1. 'items:create' logs the created items to the developer console.
 *  2. In the group of created items, a filter identifies sticky notes.
 *  3. The color of the sticky notes is set to 'cyan'.
 */

// Listen to the 'items:create' event.
miro.board.ui.on('items:create', async (event) => {
  console.log('Subscribed to the creation of new board items', event);
  console.log(event.items);
  const createdItems = event.items;

  // Filter sticky notes from the created items.
  const stickyNotes = createdItems.filter((item) => item.type === 'sticky_note');

  // Change the fill color of the sticky notes.
  for (const stickyNote of stickyNotes) {
    stickyNote.style.fillColor = 'cyan';
    await stickyNote.sync();
  }
});![]() Experimental
Experimental
experimental:items:update event
experimental:items:update eventon(event: 'experimental:items:update', handler: (event: ItemsUpdateEvent) => void): void;When an app subscribes to this event, it's dispatched to all iframes.
experimental:items:update registers the event associated with updating an item on the board.
When a user updates one or more items on the board, the registered event handler for experimental:items:update is called.
The event contains an array with the updated board items.
Your app can include logic to perform follow-up actions on the updated items. For example, it can log a list of the updated board items.
ℹ️ Note:
- Currently,
experimental:items:updatefires only when items are moved on the board, when an item dimensions are resized, when an item is rotated on the board, and when updating the scale of an item.
In the future, the event will also fire when updating other item data.
Example:
/**
 * When a user updates one or more items on the board:
 * 'experimental:items:update' logs all the updated board items to the developer console.
 */

// Listen to the 'experimental:items:update' event.
miro.board.ui.on('experimental:items:update', async (event) => {
  console.log('Subscribed to updates of board items', event);
  console.log('Updated items: ', event.items);
});
items:delete event
items:delete eventon(event: 'items:delete', handler: (event: ItemsDeleteEvent) => void): void;When an app subscribes to this event, it's dispatched to all iframes.
items:delete registers the event associated with deleting an item from the board.
When a user deletes one or more items from the board, the registered event handler for items:delete is called.
The event contains an array with the deleted board items.
Your app can include logic to perform follow-up actions on the deleted items. For example, it can log a list of the deleted board items.
Example:
/**
 * When a user deletes one or more items from the board:
 * 'items:delete' logs all deleted board items to the developer console.
 */

// Listen to the 'items:delete' event.
miro.board.ui.on('items:delete', async (event) => {
  console.log('Subscribed the deletion of board items', event);
  console.log('Deleted items: ', event.items);
});
custom:${string} event
custom:${string} eventon(event: `custom:${string}`, handler: (event: CustomEvent) => void): void;When an app subscribes to this event, it's dispatched to all iframes.
custom:${string} events implement custom actions in an app.
Web SDK custom actions behave like standard Web SDK events:
- The app subscribes to a custom action event with the
onproperty. - When the custom action event is no longer necessary, the app unsubscribes from it with the
offproperty.
Custom event naming
Custom event names always start with the custom: prefix: custom:${string}
${string} must match the value assigned to the event property when the app registers the custom action with the miro.board.experimental.action.register method.
- The event name can contain only lowercase alphabetic characters and hyphens (
^[a-z]+(-[a-z]+)\*$). - It cannot contain spaces.
- It cannot be longer than 30 characters.
off(...)
(event: 'drop', handler: (event: DropEvent) => void) => void
off property
off propertymiro.board.ui.off(event, handler);When an app no longer needs to listen to an event to trigger an event handler, it can use the off property to unsubscribe from it.
To unsubscribe from an event and its handler, pass to the off property:
- The event whose handler you want your app to unsubscribe from.
- The event handler that you previously registered with the
onproperty, and that your app no longer needs to listen to.
💡 To subscribe to an event and its handler, use the on property.
Supported events
See the supported events for the on property.
drop unsubscribe
drop unsubscribeoff(event: 'drop', handler: (event: DropEvent) => void): voidEnables unsubscribing from a drop event handler.
To unsubscribe, pass to the off property:
- The
dropevent. - The event handler that you previously registered with the
onproperty, and that your app no longer needs to listen to.
Example:
// Add a 'drop' event handler to drag and drop images.
const drop = async (event: DropEvent) => {
  const {x, y, target} = event;
  if (target instanceof HTMLImageElement) {
    const image = await miro.board.createImage({
      x,
      y,
      url: target.src,
    });
  }
};

// Register the 'drop' event so that the app listens to it.
miro.board.ui.on('drop', drop);

// Unsubscribe from the 'drop' handler.
// The app no longer creates image items on drag and drop.
miro.board.ui.off('drop', drop);
icon:click unsubscribe
icon:click unsubscribeoff(event: 'icon:click', handler: () => void) => voidEnables unsubscribing from an icon:click event handler.
To unsubscribe, pass to the off property:
- The
icon:clickevent. - The event handler that you previously registered with the
onproperty, and that your app no longer needs to listen to.
Example:
// Add an 'iconClick' event handler to open a panel upon clicking an icon.
const iconClick = async () => {
  await miro.board.ui.openPanel({
    url: 'panel.html',
  });
};

// Register the 'icon:click' event so that the app listens to it.
miro.board.ui.on('icon:click', iconClick);

// Unsubscribe from the 'icon:click' event handler.
// The app no longer enables opening a panel when clicking an icon.
miro.board.ui.off('icon:click', iconClick);
app_card:open unsubscribe
app_card:open unsubscribeoff(event: 'app_card:open', handler: (event: AppCardOpenEvent) => void): void;Enables unsubscribing from an app_card:open event handler.
To unsubscribe, pass to the off property:
- The
app_card:openevent. - The event handler that you previously registered with the
onproperty, and that your app no longer needs to listen to.
Example:
// Create an app card.
const appCard = await miro.board.createAppCard({
  title: 'This is the title of the app card',
  status: 'disconnected',
});

// Add an 'appCardOpen' event handler for the 'app_card:open' event.
const appCardOpen = async (event: AppCardOpenEvent) => {
  const appcard = event.appCard;
  const url = `https://my.app.example.com/modal.html?appCardId=${appCard.id}`;
  miro.board.ui.openModal({
    url,
  });
};

// Register the 'app_card:open' event so that the app listens to it.
miro.board.ui.on('app_card:open', appCardOpen);

// Unsubscribe from the 'app_card:open' event handler.
// The app no longer enables opening a modal with the detail view of an app card.
miro.board.ui.off('app_card:open', appCardOpen);
app_card:connect unsubscribe
app_card:connect unsubscribeoff(event: 'app_card:connect', handler: (event: AppCardConnectEvent) => void): void;Enables unsubscribing from the app_card:connect event and its handler.
To unsubscribe, pass to the off property:
- The
app_card:connectevent. - The event handler that you previously registered with the
onproperty, and that your app no longer needs to listen to.
Example:
// Create an app card.
const appCard = await miro.board.createAppCard({
  title: 'This is the title of the app card',
  status: 'disconnected',
});

// Add an 'appCardConnect' event handler for the 'app_card:connect' event.
const appCardConnect = async (event: AppCardConnectEvent) => {
  const appcard = event.appCard;
  appcard.status = 'connected';
  appcard.sync();
};

// Register the 'app_card:connect' event so that the app listens to it.
miro.board.ui.on('app_card:connect', appCardConnect);

// Unsubscribe from the 'app_card:connect' event handler.
// The app no longer enables connecting an app card to a data source.
miro.board.ui.off('app_card:connect', appCardConnect);
selection:update unsubscribe
selection:update unsubscribeoff(event: 'selection:update', handler: (event: SelectionUpdateEvent) => void): void;Enables unsubscribing from a selection:update event handler.
To unsubscribe, pass to the off property:
- The
selection:updateevent. - The event handler that you previously registered with the
onproperty, and that your app no longer needs to listen to.
Example:
// Add a 'selectionUpdate' event handler to update the color of sticky notes included in a selection.
const selectionUpdate = async (event: SelectionUpdateEvent) => {
  const selectedItems = event.items;
  const stickyNotes = selectedItems.filter((item) => item.type === 'sticky_note');
  for (const stickyNote of stickyNotes) {
    stickyNote.style.fillColor = 'cyan';
    await stickyNote.sync();
  }
};

// Register the 'selection:update' event so that the app listens to it.
miro.board.ui.on('selection:update', selectionUpdate);

// Unsubscribe from the 'selection:update' event handler.
// The app no longer enables updating the color of the sticky notes included in a selection to cyan.
miro.board.ui.off('selection:update', selectionUpdate);
online_users:update unsubscribe
online_users:update unsubscribeoff(event: 'online_users:update', handler: (event: OnlineUsersUpdateEvent) => void): voidEnables unsubscribing from an online_users:update event handler.
To unsubscribe, pass to the off property:
- The
online_users:updateevent. - The event handler that you previously registered with the
onproperty, and that your app no longer needs to listen to.
Example:
// Add an 'online_users:update' event handler to greet new online users joining the board.
let currentOnlineUsers = [];
const onlineUsersUpdate = async (event) => {
  const onlineUsers = event.users;
  const newUsers = onlineUsers.filter((user) => !currentOnlineUsers.find((u) => u.id === user.id));

  for (const newUser of newUsers) {
    await miro.board.notifications.showInfo(`Hello, ${newUser.name}!`);
  }

  currentOnlineUsers = onlineUsers;
};

// Register the 'online_users:update' event so that the app listens to it.
await miro.board.ui.on('online_users:update', onlineUsersUpdate);

// Unsubscribe from the 'online_users:update' event handler.
// The app no longer greets new online users.
await miro.board.ui.off('online_users:update', onlineUsersUpdate);
items:create unsubscribe
items:create unsubscribeoff(event: 'items:create', handler: (event: ItemsCreateEvent) => void): void;Enables unsubscribing from an items:create event handler.
To unsubscribe, pass to the off property:
- The
items:createevent. - The event handler that you previously registered with the
onproperty, and that your app no longer needs to listen to.
Example:
// Add an 'itemsCreate' event handler to update the color of user-created sticky notes.
const itemsCreate = async (event: ItemsCreateEvent) => {
  const createdItems = event.items;
  const stickyNotes = createdItems.filter((item) => item.type === 'sticky_note');
  for (const stickyNote of stickyNotes) {
    stickyNote.style.fillColor = 'cyan';
    await stickyNote.sync();
  }
};

// Register the 'items:create' event so that the app listens to it.
miro.board.ui.on('items:create', itemsCreate);

// Unsubscribe from the 'items:create' event handler.
// The app no longer updates the color of user-created sticky notes.
miro.board.ui.off('items:create', itemsCreate);![]() Experimental
Experimental
experimental:items:update unsubscribe
experimental:items:update unsubscribeoff(event: 'experimental:items:update', handler: (event: ItemsUpdateEvent) => void): void;Enables unsubscribing from an experimental:items:update event handler.
To unsubscribe, pass to the off property:
- The
experimental:items:updateevent. - The event handler that you previously registered with the
onproperty, and that your app no longer needs to listen to.
Example:
// Add an 'itemsUpdate' event handler to log user-updated board items to the developer console.
const itemsUpdate = async (event: ItemsUpdateEvent) => {
  console.log(event.items);
};

// Register the 'experimental:items:update' event so that the app listens to it.
miro.board.ui.on('experimental:items:update', itemsUpdate);

// Unsubscribe from the 'experimental:items:update' event handler.
// The app no longer enables logging user-updated board items.
miro.board.ui.off('experimental:items:update', itemsUpdate);
items:delete unsubscribe
items:delete unsubscribeoff(event: 'items:delete', handler: (event: ItemsDeleteEvent) => void): void;Enables unsubscribing from an items:delete event handler.
To unsubscribe, pass to the off property:
- The
items:deleteevent. - The event handler that you previously registered with the
onproperty, and that your app no longer needs to listen to.
Example:
// Add an 'itemsDelete' event handler to log user-deleted board items to the developer console.
const itemsDelete = async (event: ItemsDeleteEvent) => {
  console.log(event.items);
};

// Register the 'items:delete' event so that the app listens to it.
miro.board.ui.on('items:delete', itemsDelete);

// Unsubscribe from the 'items:delete' event handler.
// The app no longer enables logging user-deleted board items.
miro.board.ui.off('items:delete', itemsDelete);
custom:${string} event
custom:${string} eventoff(event: `custom:${string}`, handler: (event: CustomEvent) => void): void;
Enables unsubscribing from a custom event handler.
To unsubscribe, pass to the off property:
- The
custom:${event}event that you want your app to unsubscribe from. - The event handler that you previously registered with the
onproperty, and that your app no longer needs to listen to.
All properties
| Property | Type |
|---|---|
canOpenModal(...) |
() => Promise<boolean> |
canOpenPanel(...) |
() => Promise<boolean> |
closeModal(...) |
(result?: Result) => Promise<void> |
closePanel(...) |
(result?: Result) => Promise<void> |
getModalData(...) |
() => Promise<undefined | Data> |
getPanelData(...) |
() => Promise<undefined | Data> |
off(...) |
(event: 'drop', handler: (event: DropEvent) => void) => void |
on(...) |
(event: 'drop', handler: (event: DropEvent) => void) => void |
openModal(...) |
(
  options: Identity<{ fullscreen?: boolean; height?: number; title="url">url: string; width?: number } & conditional>
) => Promise<{ waitForClose: () => Promise<Result | undefined> }>
|
openPanel(...) |
(
  options: Identity<{ height?: number; title="url">url: string } & conditional>
) => Promise<{ waitForClose: () => Promise<Result | undefined> }>
|
Updated 4 months ago